
Live Chat

Domain Scan

(empty)

Login
Create a Free Website with Google Sites
(a Step-by-Step Guide)

What is Google Sites?
Google Sites is a user-friendly website creation tool from Google, allowing anyone to build websites without coding experience. Its drag-and-drop interface makes it easy to add and arrange content like text, images, and videos.You can make a free website by connecting your domain to Google Sites with those easy-to-use tools. Whether you're using Register.lk's Managed DNS or Cloudflare for DNS management, this guide will walk you through the steps to seamlessly link your domain to Google Sites.
Let's Get Started! Here is if you are using Register.lk managed DNS (Step 1) -
Step 1.1: Verify Your Domain with Google Search Console.
First things first, Google needs to verify that you own the domain you want to use. You need to do this through Google Search Console:1. Visit Google Search Console: Head over to the Google Search Console.
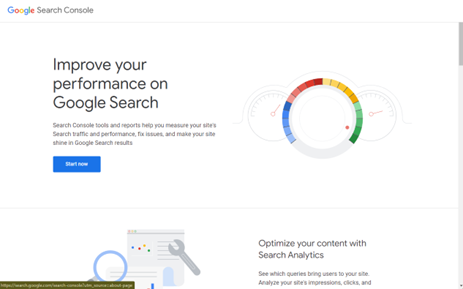
2. Sign In: Sign in to your Google account if you haven't already. Then click the "Start now" button in blue.
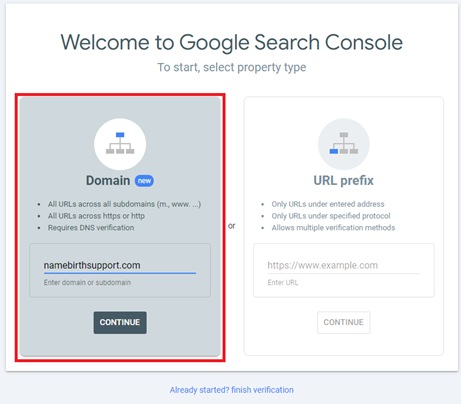
3. Enter Your Domain: Under the "Domain" option, enter your domain name without the http:// or https:// prefix (e.g: example.com). Click "Continue."
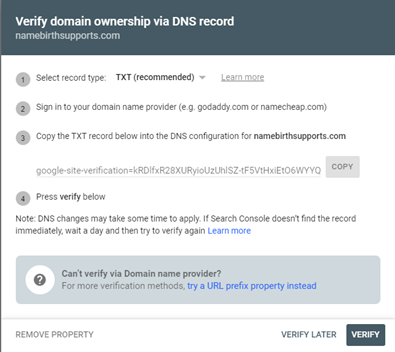
4. Get Your TXT Record: Google Search Console will provide you with a TXT record value. Copy this value; we'll need it in the next step.
Step 1.2: Update DNS Records at Register.lk
Next, let's update your domain's DNS records at Register.lk to point to Google Sites.Note: Ensure your domain's nameservers are pointed to sun.namebirth.com and moon.namebirth.com
You can use this link to know what nameservers you have already updated.
If your current nameservers are set to "sun.namebirth.com" and "moon.namebirth.com", please follow the steps below:
1. Log In to Register.lk: Log in to your Register.lk account and navigate to Domains > Manage DNS.
2. Edit DNS Zone: Click the "Edit Zone" button next to your domain name, then go to Manage DNS.
3. Remove Existing A Records: If there are any existing A records, you can remove them.
4. Add New Records: Click "Add Record" and create two new records:
TXT Record:
- Name: @
- Type: TXT
- RDATA: Paste the copied value from Google Search Console here.
CNAME Record:
- Name: www
- Type: CNAME
- RDATA: ghs.googlehosted.com.
Step 1.3: Verify Domain Ownership in Search Console
Great job! Now, let's head back to Google Search Console:- Verify Domain: Return to the page where you copied the TXT record value and click "Verify."
Step 1.4: Publish Your Site on Google Sites
Finally, it's time to publish your website!1. Go to Google Sites: Head over to Google Sites.
2. Create or Open a Site: Create a new website or open your existing one.
3. Publish: Click the blue "Publish" button in the top right corner.
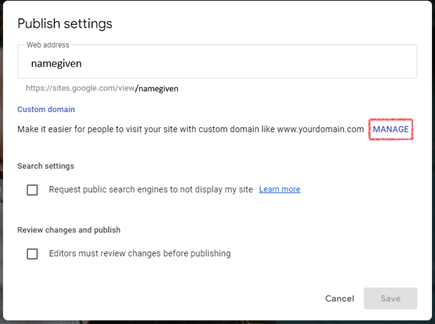
4. Set Web Address: In the web address bar, enter a name for your website.
5. Manage Custom Domain: Click "Manage" under Custom Domain.
6. Start Setup: Under Custom Domains, click "Start setup."
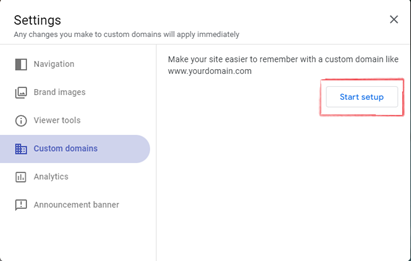
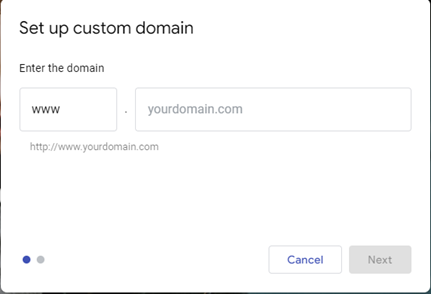
7. Enter Domain Name: Enter your domain name with the www. prefix (e.g., www.example.com). Click "Next" and then "Done" and close the settings window.
8. Publish Again: Click "Publish" again to make your website live. Make sure the "Anyone" option is selected under "Who can view this site."
Note: It can take up to 48 hours for your website to fully display on your custom domain.
If you're using Cloudflare for DNS management, follow these steps (Step 2) -
Step 2.1: Log in to Cloudflare and Connect Your Domain
Log In: Log in to your Cloudflare account and connect your domain.Step 2.2: Manage Your Domain
Select Domain: On the Home page, click on the "yourdomainname.com" Active button to manage your domain.Step 2.3: Google Verification Process and Adding DNS
Now you need to complete the Google verification process and update the DNS records. These steps are mentioned above in the step 1.1 .1. CNAME: Add this to the www. subdomain only. Ensure the CNAME record is not proxied.
2. TXT Record: Add the TXT record provided by Google in the above steps.
Then you can follow step 1.3 and step 1.4 mentioned above to complete verification and publish your website.
Step 2.4: Redirect www to Root Domain
Now, you need to redirect www.yourdomainname.com to yourdomainname.com.Before you do that, you need to add an A record to your main domain (yourdomainname.com).
1. Add A Record: You can typically use the dummy A record, 192.0.2.1, or you can obtain an A record from Cloudflare by searching for "dummy A record for Cloudflare."
Name: @
Value: 192.0.2.1 (or the A record provided by Cloudflare)
TTL: Auto
It's important to ensure that it is proxied.*
2. Create Redirection Rule: Go to Rules > Redirection Rules > Create a rule.
- Provide it a name, select "All incoming requests," and under "Then..." select "Static URL."
- Enter the URL: https://www.yourdomainname.com (include the https:// part).
Conclusion
By following these steps, you can successfully connect your domain to Google Sites, ensuring a professional and accessible web presence. Whether using Register.lk Managed DNS or Cloudflare, these instructions will help you navigate the process smoothly.
Embrace the power of Google Sites and enjoy the simplicity and flexibility it offers for creating and managing your website. Happy site building!
 Written by: Register.lk Support Hero - Kesaru


