Live Chat

Domain Scan

(empty)

Login
How to Automate Your Website with Cron Jobs in cPanel
(30-jul-2024)

Managing routine tasks efficiently is crucial for any business. Cron jobs offer an automated way to schedule and run scripts, freeing up your time for more critical activities. At Register.lk, we specialize in providing top-tier hosting solutions, and today we'll guide you through setting up cron jobs using cPanel, ensuring your scripts run seamlessly and on schedule.
What Are Cron Jobs?
Cron jobs are scheduled tasks that run scripts or commands automatically at specified times or intervals. They are incredibly useful for performing repetitive tasks, such as updates, maintenance, sending out notifications, or cleaning up temporary files. By automating these tasks, cron jobs enhance your website's efficiency and reliability, ensuring that essential operations are carried out consistently without manual intervention.Setting Up Cron Jobs in cPanel
1. Accessing cPanel Cron Jobs- Log in to your cPanel account.
- Navigate to the "Advanced" section.
- Click on the "Cron Jobs" icon.

2. Understanding Cron Job Settings
- Email Notifications: Enter your email address to receive notifications whenever a cron job runs.
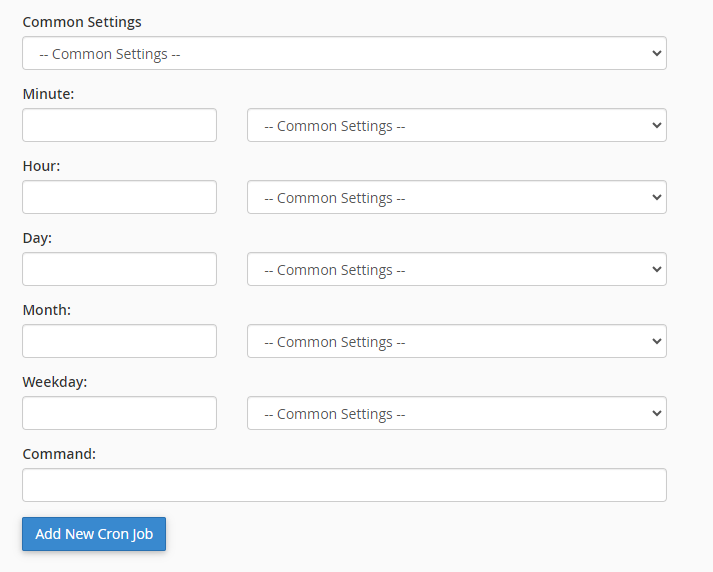
- Cron Job Schedule: This section allows you to specify the timing for your cron job. You can set it to run by minute, hour, day, month, or weekday. You can also use common settings like daily, hourly, weekly, etc.
- Command: This is where you enter the execution command with the path of the script that you want to run.


3. Configuring Your First Cron Job
- In the "Add New Cron Job" section, you'll find drop-down menus for setting the schedule.
- Select the frequency at which you want the job to run.
- You can use common settings such as "Daily," "Hourly," "Weekly," etc., to simplify the process.
- Enter the execution command with the path for your script. This could be a PHP, Python, or shell script. For example:
/usr/local/bin/php /home/cp_user/public_html/your_script.php
4. Managing Existing Cron Jobs
- You can view, edit, or delete existing cron jobs in the "Current Cron Jobs" section.
- Make any necessary adjustments to the schedule or command as your needs change.

Best Practices for Cron Jobs
- Test Your Scripts: Before scheduling, ensure your scripts run correctly by executing them manually.
- Monitor Cron Jobs: Regularly check your email notifications for any errors or issues.
- Use Descriptive Commands: Include comments or notes in your commands to make them easier to understand and manage.
Common Use Cases
Cron jobs can be used for various tasks, including:- Rotating Log Files: Rotate and compress log files to manage disk space and keep logs organized.
- System Maintenance: Schedule tasks like clearing cache or optimizing your database.
- Content Updates: Automatically update content or pull data from external sources to keep your site current.
Please note that the minimum interval for setting up Cron Jobs in Shared Hosting packages is 15 minutes, so make sure your Cron interval is greater than 15 minutes.
Conclusion
Setting up cron jobs via cPanel can dramatically enhance your operational efficiency by automating repetitive tasks. This powerful tool allows you to manage scheduled operations with ease, letting you concentrate on more strategic and impactful areas of your business. By leveraging cron jobs, you can ensure that routine tasks are handled automatically, reducing manual effort and minimizing errors. At Register.lk, we're committed to providing you with exceptional hosting solutions and expert support.Set up your cron jobs today and experience the benefits of automation.
 Written by: Register.lk Support Hero - Kulitha


