Live Chat

Domain Scan

(empty)

Login
How to Connect a cPanel MySQL Database to Visual Studio Code
(12-feb-2025)

Managing databases directly from your Integrated Development Environment (IDE) can streamline your workflow, especially when working with complex projects. This guide will walk you through the steps to connect a cPanel MySQL database to Visual Studio Code using the SQL Tools extension, ensuring a seamless database management experience.
Prerequisites
Before getting started, ensure you have the following:
- cPanel account with an existing MySQL database.
- Visual Studio Code (VS Code) installed on your computer.
- Database credentials including host, username, password, and database name.
Step 1: Install SQL Tools Extension in Visual Studio Code
- Open Visual Studio Code and navigate to the Extensions Marketplace (Ctrl + Shift + X or Command + Shift + X on macOS).
- Search for "SQLTools" in the search bar.
- Select the SQLTools extension and click "Install."

Once installed, the extension will be available in the sidebar for managing database connections and running queries.
Step 2: Install SQLTools MySQL/MariaDB/TiDB Driver
To connect MySQL databases, you need to install the appropriate driver:
- Go to the Extensions Marketplace in Visual Studio Code.
- Search for "SQLTools MySQL/MariaDB/TiDB Driver."
- Select the driver from the results and click "Install."

Once installed, this driver will allow SQL Tools to interact with MySQL databases.
Step 3: Enable Remote Database Access in cPanel
By default, cPanel restricts external connections to MySQL databases. To allow Visual Studio Code to connect to your database, follow these steps:
- Log in to your cPanel account by navigating to
yourdomain.com/cpaneland entering your credentials. - Scroll down to the Databases section and click on "Remote Database Access".
- In the "Add Access Host" field, enter your local machine's public IP address. If you're unsure of your IP, you can find it from here.
- Click "Add Host" to save your settings.

Step 4: Gather Database Connection Details from cPanel
You will need the following details to connect your cPanel MySQL database to VS Code:
- Host: The shared IP address under the General Information section in cPanel.
- Port: The default MySQL port is
3306. - Database Name: Found in the MySQL Databases section.
- Username and Password: Set for the database user.
Step 5: Configure SQL Tools in Visual Studio Code
- Open Visual Studio Code and click on the SQLTools icon in the sidebar.
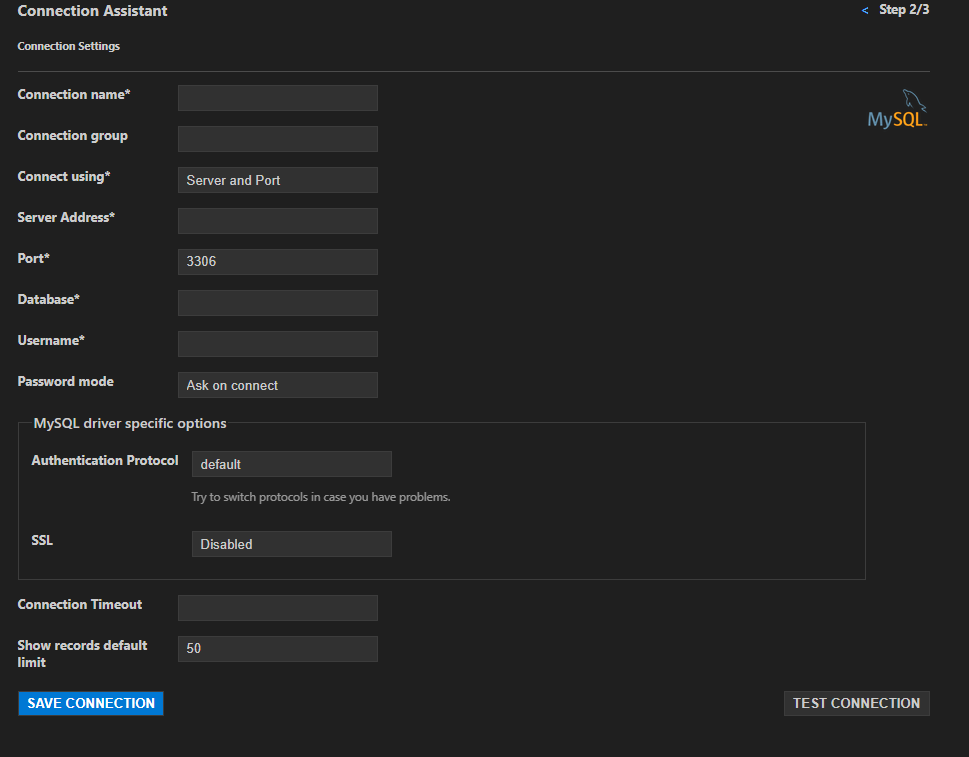
- Click "Add New Connection" and select "MySQL."
- Fill in the required details:
- Connection Name: A unique name for your connection.
- Server Address: The shared IP address from cPanel.
- Port:
3306. - Database: The name of your MySQL database.
- Username: Your database username.
- Password: Select "Ask on Connect." Enter the associated password when prompted during connection testing.
- Click "Test Connection" to verify that the details are correct. If successful, you will see a confirmation message.
- Save the connection configuration.

Step 6: Manage Your Database in Visual Studio Code
With the connection established, you can now:
- Browse tables and database schemas directly within VS Code.
- Execute SQL queries and view the results in real time.
- Export or import data as needed.
The SQL Tools extension also provides features like query formatting, autocomplete, and history tracking, making database management much more efficient.
Before making significant changes to your database, always create a full backup. This ensures that in case of an issue, you can restore your database quickly and avoid data loss.
Conclusion
Connecting a cPanel MySQL database to Visual Studio Code using the SQLTools extension simplifies database management and enhances your productivity. By following these steps, you can efficiently handle queries, optimize database performance, and streamline your development workflow. For reliable hosting and database management solutions, explore the offerings at Register.lk today.
Simplify your database management today!
 Written by: Register.lk Support Hero - Kulitha


