Live Chat

Domain Scan

(empty)

Login

How to Create a Free Website Using Blogger with a Register.lk Domain
(05-jul-2024)
Are you looking to create a professional-looking website without spending a dime? With Blogger and a custom domain from Register.lk, you can do just that. Follow these simple steps to connect your Register.lk domain to your Blogger site and start building your online presence today!
Step 1: Setting Up in Blogger
Let's begin with configuring your custom domain in Blogger:- Go to Blogger and log in to your account.
- Select the blog you want to connect the domain to.
- In the left-hand menu, click on Settings.
- Under Publishing, find Custom domain and click on it.
- Enter your domain name, including the "www" part.
- Click Save.
- Blogger will display two CNAME records. These are special records that point your domain to your blog's location.


Step 2: Accessing Your Register.lk DNS Panel
Next, let's move over to Register.lk to configure your domain settings:- Log in to your Register.lk account.
- Navigate to Domains and then My Domains.

Step 3: Updating Your Domain's Nameservers (Optional)
This step might not be necessary, depending on your current Register.lk settings. Click here to check which nameservers have been updated. If you need to, you can change your nameservers using following steps.- Log into your Register.lk account.
- Navigate to Domains and select My Domains.
- Use the drop-down menu next to your domain name.
- Choose Manage Nameservers.
- Opt for Use custom nameservers (enter below).
- Enter the Nameserver details in the appropriate fields and select Change Nameservers.
- sun.namebirth.com
- moon.namebirth.com
Step 4: Adding CNAME and A Records
Now, let's add the necessary DNS records to point your domain to Blogger:- Navigate to the Domains section in the menu bar and select Manage DNS.
- Locate your domain name and click on Add New Zone next to it.
- Confirm by clicking Add Zone in the pop-up window.
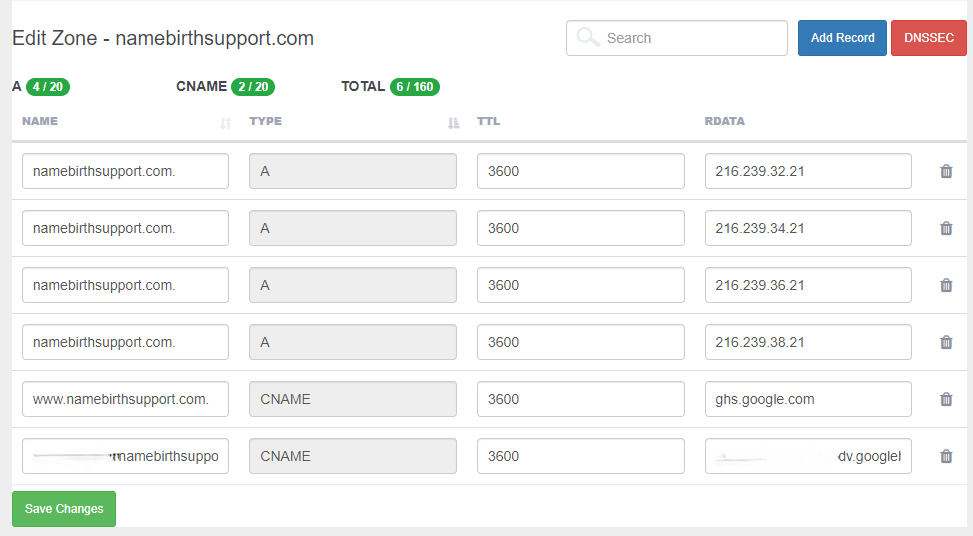
- Under the newly added zone, click the Edit Zone button.
- You can either modify the existing records or delete them all to start a new.
- To add a new DNS record, simply click on Add Record.
CNAME Records (from Step 1):
- In the NAME field, enter the value displayed for Name in Blogger's error message.
- In the RDATA field, enter value displayed for Destination.
- Repeat this process for the second CNAME record, using the values from Blogger.
- 216.239.32.21
- 216.239.34.21
- 216.239.36.21
- 216.239.38.21