Live Chat

Domain Scan

(empty)

Login
How to Disable Plugins and Themes When You Cannot Access Your WordPress Admin
(31-jan-2025)
Getting locked out of your WordPress admin can be stressful, especially when caused by a plugin or theme conflict. However, you don't need access to the admin dashboard to fix this issue. In this guide, we'll show you two simple methods to disable plugins and themes using "File Manager" and "phpMyAdmin" via cPanel.
Why Disable Plugins and Themes Without Admin Access?
WordPress plugins and themes add incredible functionality and design to your website, but they can sometimes cause conflicts or errors. Issues like a blank screen (commonly known as the "White Screen of Death") or critical errors can block access to your WordPress admin. Disabling plugins and themes is often the first troubleshooting step to regain access and restore functionality.
Method 1: Using File Manager in cPanel
If you have cPanel access, you can use the File Manager tool to disable plugins and themes.
Step-by-Step Guide:
- Log in to cPanel:
- Visit
yourdomain.com/cpaneland enter your login credentials.
- Visit
- Open File Manager:
- In the cPanel dashboard, click File Manager under the Files section.
- Navigate to the
public_htmlfolder (or the folder where your WordPress is installed).

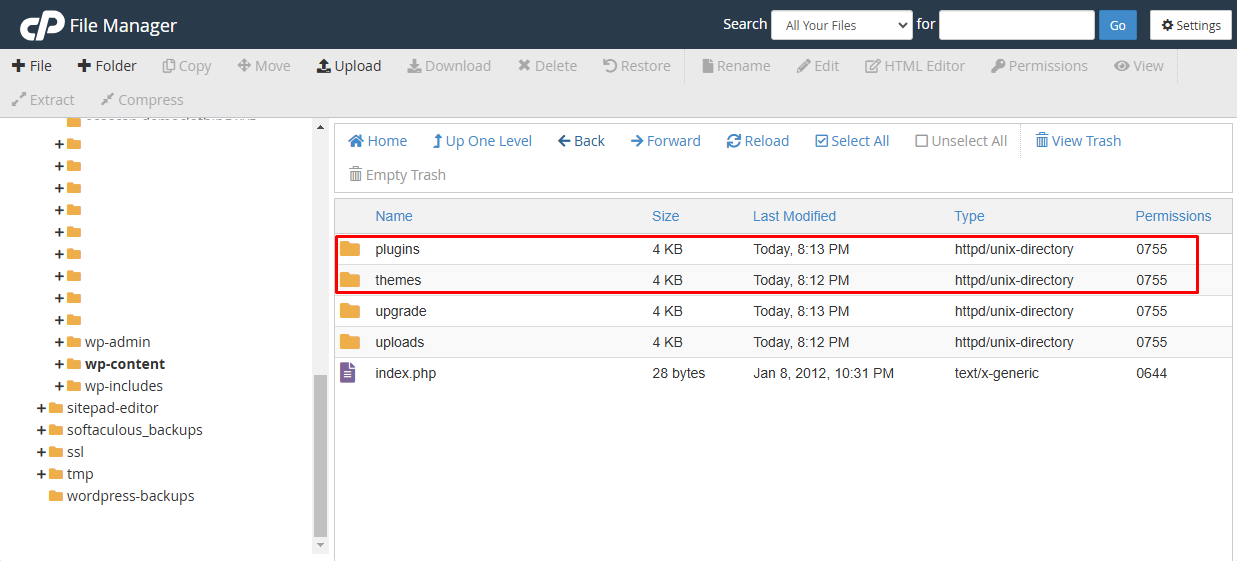
- Disable Plugins:
- Open the
wp-content/pluginsfolder. - Locate the folder of the plugin causing the issue.
- Rename the folder (e.g.,
plugin-nametoplugin-name_disabled). This will deactivate the plugin.
- Open the
- Disable Themes (Optional):
- Navigate to the
wp-content/themesfolder. - Locate the folder of the active theme.
- Rename the folder (e.g.,
theme-nametotheme-name_disabled). WordPress will automatically switch to a default theme.
- Navigate to the
Method 2: Using phpMyAdmin
For a more database-focused approach, phpMyAdmin allows you to disable plugins and themes directly in your WordPress database.
Step-by-Step Guide:
- Log in to cPanel:
- Access your cPanel dashboard via
yourdomain.com/cpanel.
- Access your cPanel dashboard via
- Open phpMyAdmin:
- Under the Databases section, click phpMyAdmin.
- Select your WordPress database from the left-hand menu.

- Disable Plugins:
- Click on the
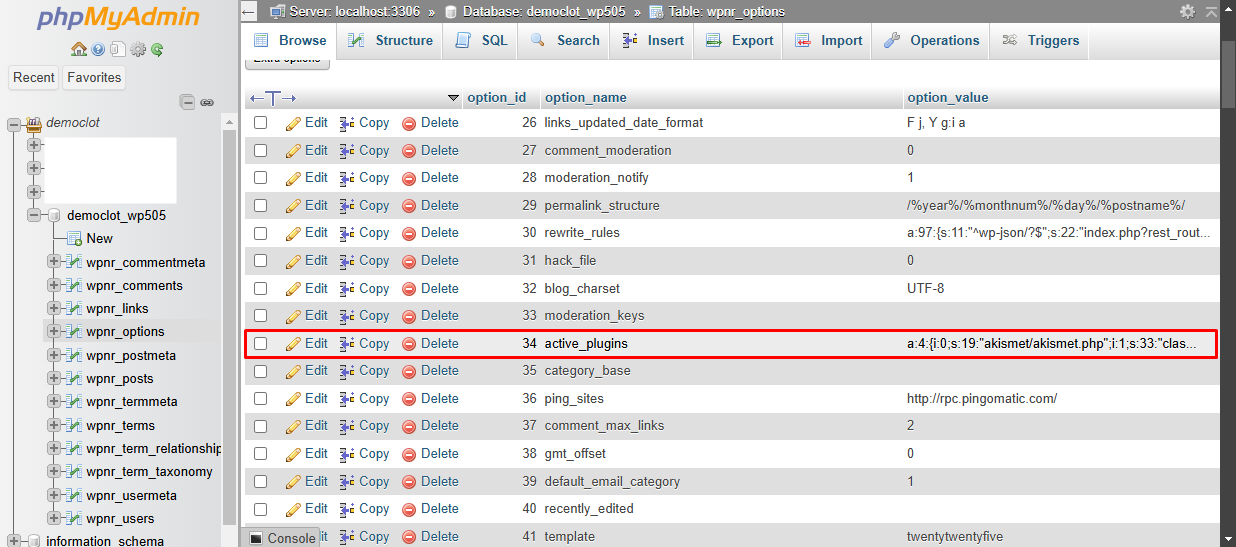
wp_optionstable (your table prefix may vary, e.g.,wp123_options). - Locate the row where the
option_nameisactive_plugins. - Click Edit and set the value to
a:0:{}. This disables all plugins.
- Click on the
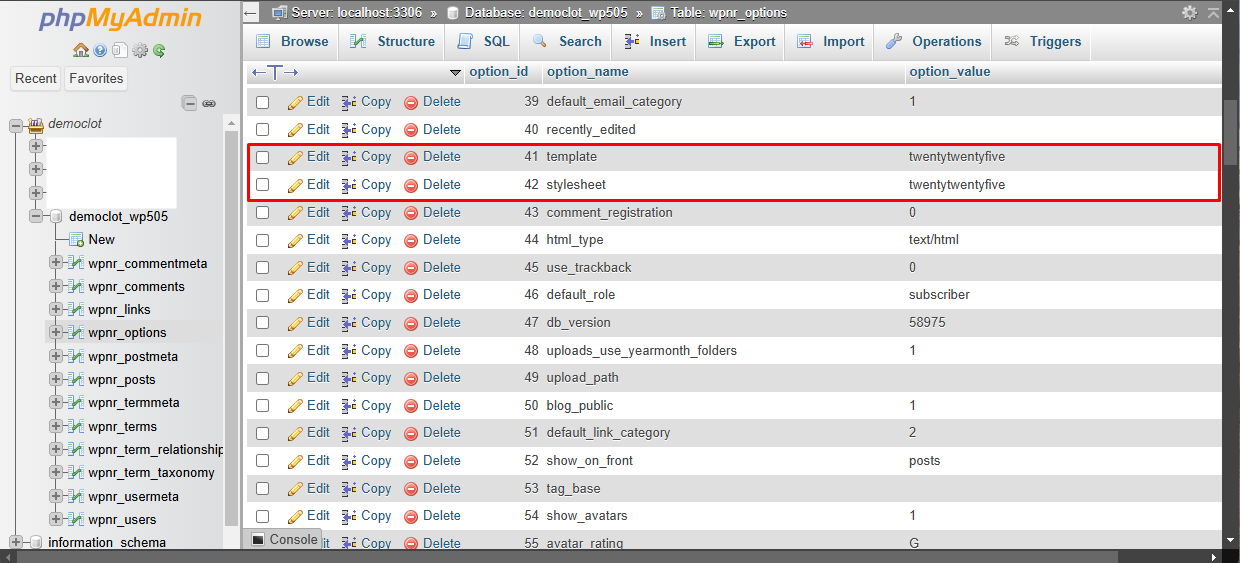
- Disable Themes (Optional):
- In the same
wp_optionstable, find the rows where theoption_nameistemplateandstylesheet. - Update their values to a default WordPress theme, such as
twentytwentythree.
- In the same
Pro Tips for a Smooth Recovery
- Backup First: Before making any changes, create a full backup of your WordPress site to avoid data loss.
- Check for Updates: After disabling plugins and themes, update WordPress, plugins, and themes to the latest versions.
- Use Debugging Tools: Enable WordPress debugging logs to identify issues quickly.
Conclusion
Disabling plugins and themes through File Manager or phpMyAdmin is a quick and effective way to troubleshoot WordPress issues when you can't access your admin dashboard. Both methods are beginner-friendly and require only basic cPanel access. At register.lk, we offer reliable hosting solutions with robust tools like cPanel to help you manage your WordPress site effortlessly. If you're looking for top-notch hosting and expert support, check out our hosting packages today!
Simplify your troubleshooting today!
 Written by: Register.lk Support Hero - Kulitha


