
Live Chat

Domain Scan

(empty)

Login
How to Transfer Files to Your Website via FTP
(25-jul-2024)

Managing files on your website is a critical task for maintaining its functionality and ensuring a seamless user experience. There are various methods to manage website files, including using a content management system (CMS), web-based file managers provided by hosting services, and command-line tools. Each method has its own advantages and use cases. In this guide, we'll focus on one of the most reliable and efficient methods: using File Transfer Protocol (FTP).
What is FTP?
File Transfer Protocol (FTP) is a standard network protocol used for transferring files between a client and a server on a computer network. It was developed in the early 1970s to allow the sharing of files between different systems, and it has since become one of the most widely used protocols for file transfer. Creating and connecting to an FTP (File Transfer Protocol) account in cPanel is a straightforward process that allows users to manage their website files efficiently. Below is a step-by-step guide on how to create and connect to an FTP account in cPanel.Creating and Connecting to an FTP Account
Step 1: Log in to cPanel
1. Log in to you Register.lk account and go to Services > My Services.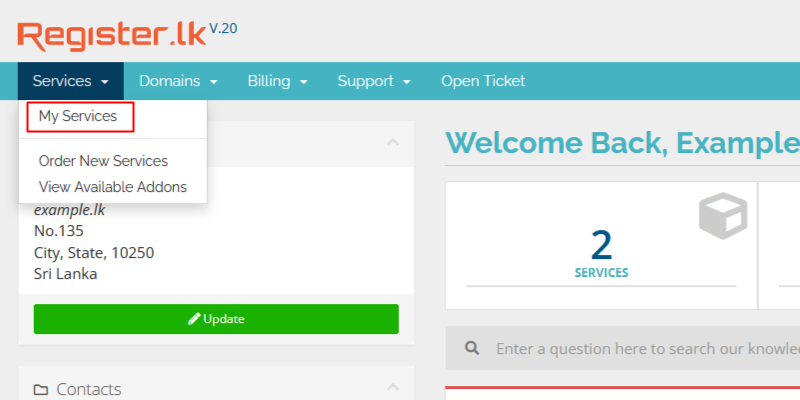 2. Click on the green color 'Active' button in front of the relevant hosting package.
 3. Click on "Login to cPanel" on the panel on left.
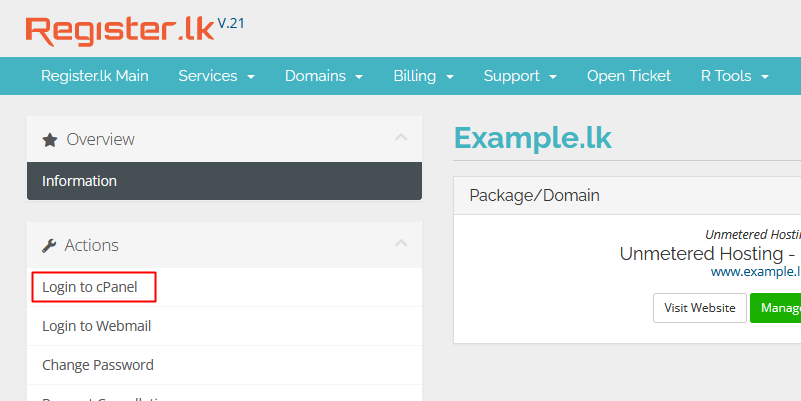 (You can type "yourdomain.com/cpanel" in your browser to log in to your cPanel directly using your cPanel username and password.)
Step 2: Create an FTP Account
1. In cPanel go to 'FTP Accounts' in 'Files' category.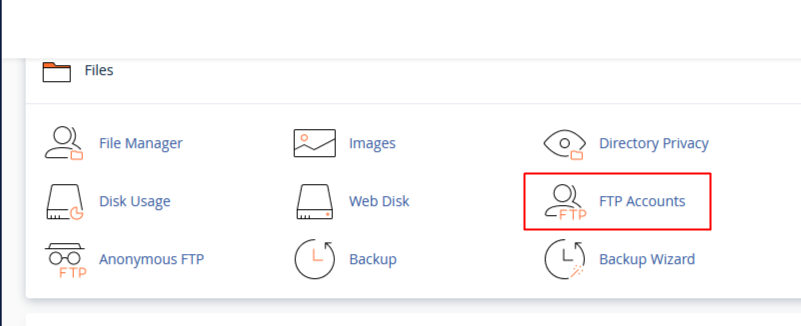 2. Fill in the FTP Account Details:
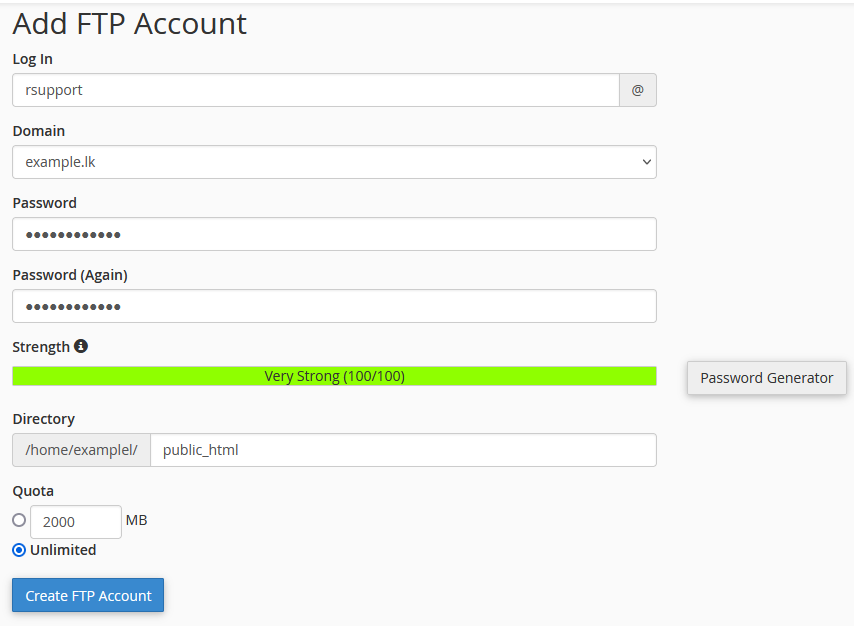
- Log in: Enter the desired username for the new FTP account.
- Domain: Select the domain (if you have multiple domains) for the FTP account.
- Password: Enter a strong password for the account. It's recommended to use a mix of uppercase and lowercase letters, numbers, and special characters. Alternatively, you can use the "Password Generator" to create a strong password.
- Password (Again): Re-enter the password to confirm.
- Directory: cPanel will automatically populate this field with a directory named after the FTP account. You can change this to a specific directory if needed. Note that the FTP account will have access only to this directory and its subdirectories.
- Quota: Set a disk space quota for the FTP account. You can choose "Unlimited" or specify a limit in MB.
- Click the "Create FTP Account" button to finalize the creation.
Step 3: Connect to the FTP Account
To connect to your FTP account, you can use an FTP client such as FileZilla, Cyberduck, or any other preferred client. Below are the general steps for connecting using FileZilla:1. Download and Install FileZilla:
2. Open FileZilla and Configure a New Site:
3. Enter the FTP Account Details:
- Host: Enter your shared IP (shared IP address is located under General Information in cPanel main page).
- Port: Enter the default FTP port which is 21.
- Protocol: Select "FTP - File Transfer Protocol" or "FTPS - FTP over explicit TLS/SSL" if you're using a secure connection.
- Encryption: If you chose FTPS, select "Require explicit FTP over TLS."
- Logon Type: Select "Normal."
- User: Enter the FTP username you created in cPanel (rsupport@example.lk as per the account created in steps above).
- Password: Enter the password for the FTP account.
- Click the "Connect" button to establish the connection.
- Also, you may use "Quick Connect" option in FileZilla to connect via FTP.
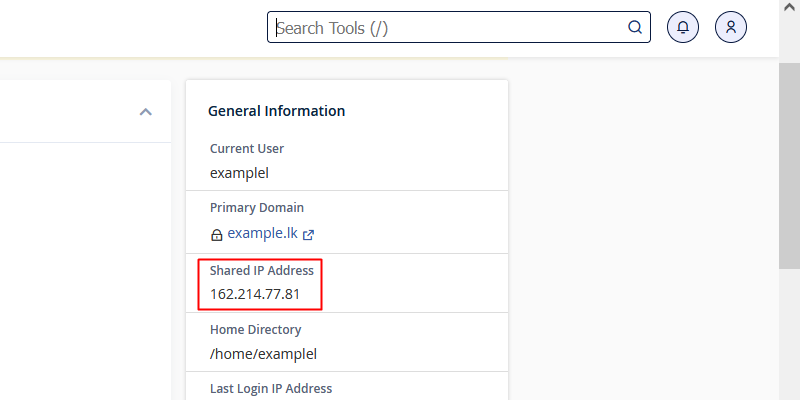

Step 4: Upload and Manage Files
Once connected, you can start uploading and managing your website files. The left panel in FileZilla shows your local files, while the right panel shows the files on your server. You can drag and drop files between these panels to upload or download files.Conclusion
Managing your website files using FTP is a powerful and efficient way to maintain control over your web content. By understanding how to set up and use an FTP client, navigate your web server's directory structure, and perform essential file management tasks, you can ensure your website remains well-organized and functional. Regular maintenance and security measures will keep your site running smoothly and protect your data.By following these steps, you should be able to create and connect to an FTP account in cPanel, allowing you to manage your website files efficiently.
 Written by: Register.lk Support Hero - Richie


