Live Chat

Domain Scan

(empty)

Login
Troubleshoot WordPress Like a Pro: How to Enable the Debug Log
(12-sept-2024)

When managing a WordPress website, encountering errors is inevitable. Whether it's a plugin conflict, a theme issue, or a coding error, identifying the root cause is crucial to keeping your site running smoothly. Fortunately, WordPress offers a built-in debug tool to help you uncover and resolve these issues. However, displaying debug information directly on a live site isn't recommended as it may expose sensitive data to your visitors. Instead, the best practice is to enable the WordPress Debug Log, which records errors in a log file for safe review. In this guide, we'll walk you through the process of enabling the WordPress Debug Log, so you can troubleshoot issues without compromising your live website.
Why Enable the WordPress Debug Log?
Enabling the WordPress Debug Log is a proactive step in maintaining your website's health. This tool allows you to capture and review errors in a controlled environment, making it easier to pinpoint issues without disturbing your visitors. It's especially useful for developers and site administrators who want to ensure their WordPress site is running optimally.
Steps to Enable the WordPress Debug Log:
- Log in to cPanel and Navigate File Manager:
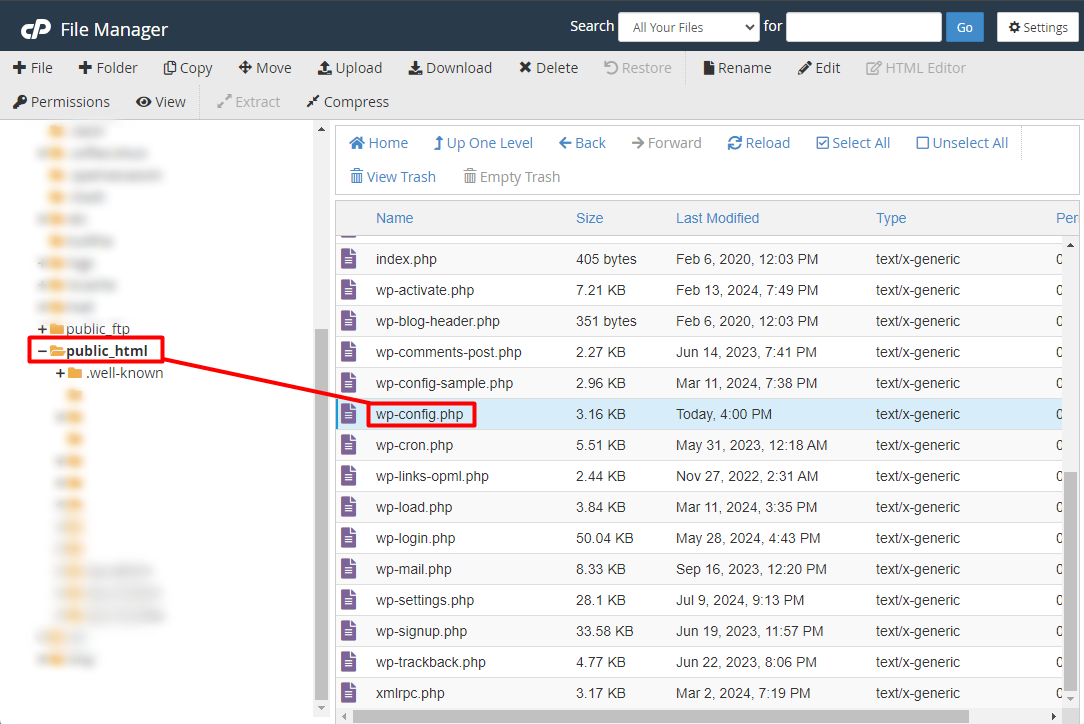
First, log in to your cPanel account. This can typically be done by navigating to 'yourdomain.com/cpanel' and entering your credentials. Once logged in, navigate to the File Manager. This will give you access to your WordPress files, allowing you to make the necessary changes. - Edit the wp-config.php File:
In the File Manager, navigate to the root directory of your WordPress installation, found in the public_html folder. Here, you'll find thewp-config.phpfile. Open thewp-config.phpfile in a text editor. - Modify the Debug Settings:
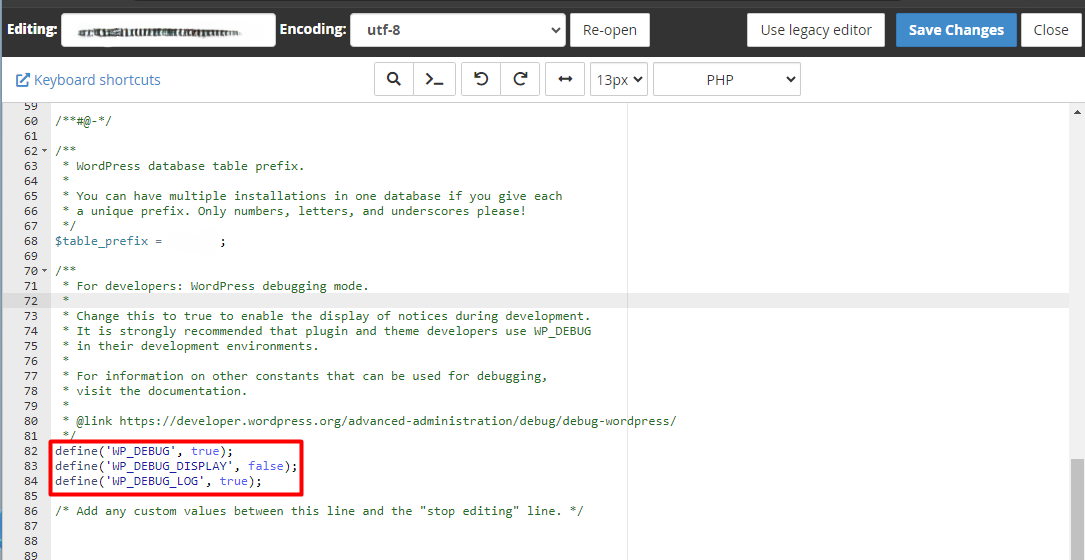
Scroll down to the bottom of the file, where you'll find the following line of code:define('WP_DEBUG', false);To enable the debug log, replace this line with the following code:define('WP_DEBUG', true);Explanation of the Code:
define('WP_DEBUG_DISPLAY', false);
define('WP_DEBUG_LOG', true);
WP_DEBUG: When set to true, this enables the debugging mode in WordPress.WP_DEBUG_DISPLAY: By default, this is set to true, which means errors will be displayed directly on your website.WP_DEBUG_LOG: When enabled, all errors will be logged to a file nameddebug.login the/wp-content/directory.
- Save and Upload the wp-config.php File:
After making these changes, save thewp-config.phpfile. - Reviewing the Debug Log:
Any errors that occur will now be recorded in thedebug.logfile located in the/wp-content/directory. You can review this file to identify and troubleshoot issues on your site.


Understanding WP_DEBUG_LOG and WP_DEBUG_DISPLAY
WP_DEBUG_LOG and WP_DEBUG_DISPLAY are two important configurations in WordPress that control how debugging information is handled.
- WP_DEBUG_LOG: When set to true, all error messages and warnings are written to a log file, typically located in the
/wp-content/directory. This is particularly useful for debugging issues without disrupting the user experience on the live site. - WP_DEBUG_DISPLAY: By default, this is set to true, meaning errors will be displayed directly on your website.
It's not recommended to change WP_DEBUG_DISPLAY to true. This is because any errors will then display on your live website. By enabling WP_DEBUG_LOG, you can view the same errors in your /wp-content/debug.log file.
Additional Debugging Tools and Plugins
While the built-in WordPress debugging options are powerful, there are additional tools and plugins available to enhance your debugging process:
- Query Monitor: This plugin provides detailed information about database queries, hooks, conditionals, and more.
- Debug Bar: Adds a debug menu to the admin bar, showing query, cache, and other useful information.
- Log Deprecated Notices: Logs deprecated functions and files, helping you to update your code to the latest WordPress standards.
Best Practices for Debugging in WordPress
To ensure effective and safe debugging in WordPress, consider the following best practices:
- Always back up your website before making any changes to core files or installing new plugins.
- Use a staging environment for testing and debugging to avoid impacting your live website.
- Always keep your WordPress, themes, and plugins updated to the latest versions to minimize compatibility issues.
- Review the debug log regularly to catch and fix issues before they escalate.
- Disable debugging tools on live websites once troubleshooting is complete to maintain security and performance.
Conclusion
By enabling the WordPress Debug Log and following these best practices, you can effectively troubleshoot your WordPress website without compromising user experience. As Sri Lanka's #1 domain and hosting provider, register.lk is here to support you in maintaining a robust and secure WordPress website. Remember, always back up your website before making any changes to ensure you can recover quickly if anything goes wrong.
Enable your debug log today and keep your WordPress website running smoothly!
 Written by: Register.lk Support Hero - Kulitha


