Live Chat

Domain Scan

(empty)

Login
Unlocking the Power of Core Packages via Shell Access
(17-jul-2024)

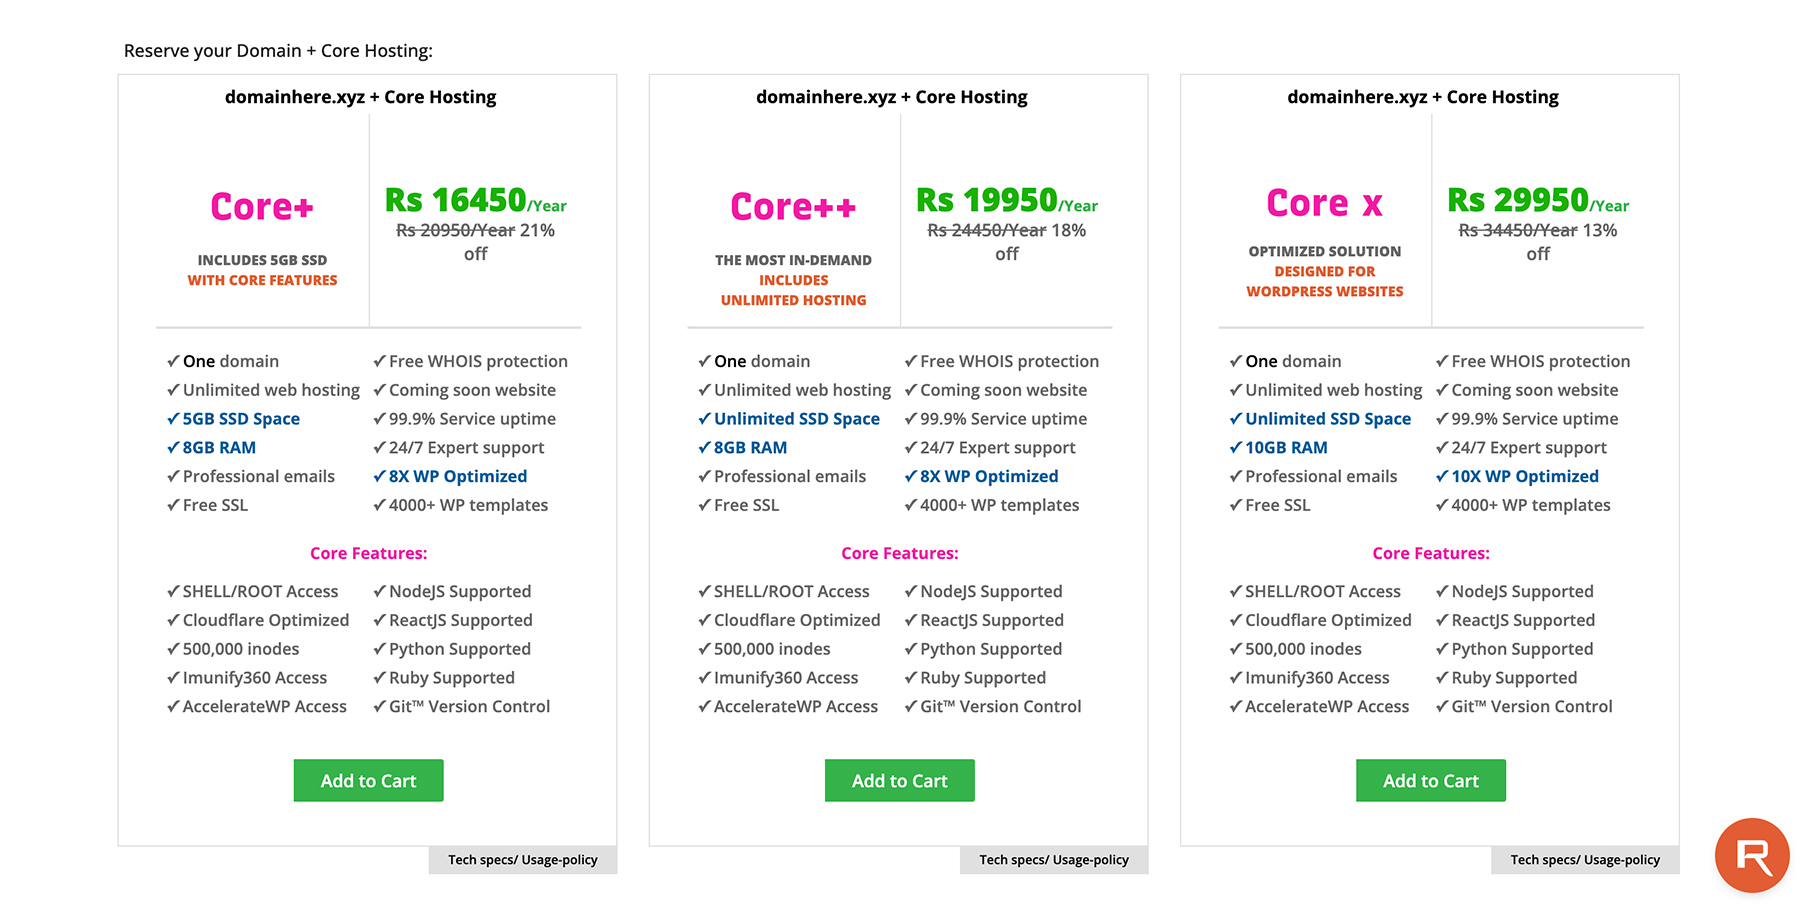
In response to the growing demand for versatile hosting solutions, Register.lk has introduced its new 'Core Hosting Packages'. These shared hosting packages come with features and specifications typically found in VPS packages. With root/shell access included, you can install Python, React, Node.js, Ruby on Rails, and more. In this comprehensive guide, we'll walk you through setting up Node.js, Ruby, and Python-based applications on cPanel using these powerful Core packages.
What you need to get started:
- cPanel access of a Core Hosting Package
- Basic knowledge of terminal commands
Step 1: Export Environment to Run npm Commands
To ensure that the necessary Node.js binaries are available, start by exporting the required environment variable.
Step 2: Create Main App Directory
Step 3: Install React App
Step 4: Create Express.js Server
Step 5: Initialize Node.js and Create package.json
Step 6: Install Express.js
Step 7: Set Up Node.js App in cPanel
Step 8: Access Your Application
To ensure that the necessary Node.js binaries are available, start by exporting the required environment variable.
- Open the Terminal in cPanel.
- Export the required environment:
export PATH=/opt/alt/alt-nodejs20/root/usr/bin:$PATH
Step 2: Create Main App Directory
- Navigate to your home directory:
cd /home/CPUSER
- Create the main app directory:
            mkdir my-react-app

            cd my-react-app
Step 3: Install React App
- Now, initialize a new React application using npx.
- Create the React app in the client directory:
npx create-react-app client
- Navigate to the React app directory:
cd client
- Build the React app:
npm run build
- Navigate back to the main app directory:
cd ..
Step 4: Create Express.js Server
- Create the server.js file:
vi server.js
- Add the following code to server.js:
            const express = require('express');

            const path = require('path');


            const app = express();

            const PORT = process.env.PORT || 5000;


            // Serve static files from the React app

            app.use(express.static(path.join(__dirname, 'client/build')));


            // An example API endpoint

            app.get('/api/greeting', (req, res) => {

              res.json({ message: 'Hello from the backend!' });

            });


            // The "catchall" handler: for any request that doesn't

            // match one above, send back React's index.html file.

            app.get('*', (req, res) => {

              res.sendFile(path.join(__dirname + '/client/build/index.html'));

            });


            app.listen(PORT, () => {

              console.log(Server is running on port ${PORT});

            });
- Save and exit the editor by pressing :wq.
Step 5: Initialize Node.js and Create package.json
- Initialize your Node.js project to create a package.json file.
- Initialize Node.js:
npm init -y
Step 6: Install Express.js
- Install the Express.js framework to handle the server-side logic.
- Install Express:
npm install express
Step 7: Set Up Node.js App in cPanel
- Go to the "Setup Node.js App" in cPanel.
- Click on "Create Application".
- Fill in the application details:
- Node.js Version: 20.14.0
- Application Mode: Production
- Application Root: my-react-app
- Application URL: yourdomain.tld
- Application Startup File: server.js
- Click on "Create".
Step 8: Access Your Application
- Finally, visit the Application URL you specified to see your React app in action (e.g., https://yourdomain.tld).
Step 1: Setup Ruby Application in cPanel
Step 2: Activate Ruby Environment in Terminal
Step 3: Create a Gemfile
Step 4: Install Required Gems (Rails)
Step 5: Create a New Rails App
Step 6: Generate Welcome Controller
Step 7: Update Development Configuration
Step 8: Start the Rails Server
Step 9: Access Your Application
- Begin by setting up your Ruby application in cPanel.
- Go to the "Setup Ruby App" in cPanel.
- Fill in the application details:
- Ruby version: 3.2
- App Directory /home/CPUSER/: my-rails-app
- App Domain/URI: yourdomain.tld
- Click on "Setup".
Step 2: Activate Ruby Environment in Terminal
- Next, activate the Ruby environment and navigate to your application directory.
            source /home/CPUSER/rubyvenv/my-rails-app/3.2/bin/activate

            cd my-rails-app
Step 3: Create a Gemfile
- Create a new Gemfile to specify the Rails gem.
vi Gemfile
- Add the following content to the Gemfile:
            source 'https://rubygems.org'

            gem 'rails'
Step 4: Install Required Gems (Rails)
- Install the necessary gems for Rails.
bundle install
Step 5: Create a New Rails App
- Generate a new Rails application in your specified directory.
rails new /home/CPUSER/my-rails-app
- When prompted, type Y to confirm and overwrite config.ru and Gemfile.
Step 6: Generate Welcome Controller
- Create a new controller for the welcome page.
rails generate controller Welcome index
Step 7: Update Development Configuration
- Edit the config/environments/development.rb file to allow specific hosts by adding the following line:
            # Allow specific hosts

            config.hosts << "yourdomain.tld"
Step 8: Start the Rails Server
- Finally, start the Rails server with your domain and desired port.
bundle exec rails server -b yourdomain.tld -p 30001
Step 9: Access Your Application
- Finally, visit the Application URL you specified to see your app in action
(e.g., https://yourdomain.tld:30001).
Step 1: Setup Python Application in cPanel
Step 2: Activate the Python Environment via Terminal
Step 3: Install Django
Step 4: Create a Django Project
Step 5: Configure passenger_wsgi.py
Step 6: Configure Django Settings and Apply Migration
Step 7: Restart the Application
Step 8: Access Your Application
- Configure the Python application in cPanel.
- Go to the "Setup Python App" in cPanel.
- Click on "Create Application".
- Fill in the application details:
- Python version: 3.12.4
- Application root: my-django-app
- Application URL: yourdomain.tld
- Application Startup File: (leave blank)
- Application entry point: (leave blank)
- Click on "Create".
Step 2: Activate the Python Environment via Terminal
- To activate your Python virtual environment, follow these steps:
- Open the Terminal in cPanel.
- Activate the virtual environment:
source /home/CPUSER/virtualenv/my-django-app/3.12/bin/activate
Step 3: Install Django
- Navigate to your home directory:
cd /home/CPUSER/my-django-app
- Install Django using pip:
pip install django
Step 4: Create a Django Project
- Ensure you are in your virtual environment and install Flask using pip:
- Create a new Django project named mysite:
django-admin startproject mysite .
Step 5: Configure passenger_wsgi.py
- Modify the contents of passenger_wsgi.py:
vi passenger_wsgi.py
- Add the following code to passenger_wsgi.py:
            import sys

            import os


            # Add your project directory to the sys.path

            project_home = u'/home/CPUSER/my-django-app'

            if project_home not in sys.path:

                sys.path = [project_home] + sys.path


            # Set the Django settings module environment variable

            os.environ['DJANGO_SETTINGS_MODULE'] = 'mysite.settings'


            # Import Django and get the WSGI application

            import django

            django.setup()

            from django.core.wsgi import get_wsgi_application

            application = get_wsgi_application()
- Save and exit the editor by pressing :wq.
Step 6: Configure Django Settings and Apply Migration
- Edit the mysite/settings.py file to allow your domain:
ALLOWED_HOSTS = ['yourdomain.tld']
- Apply Migrations:
python manage.py migrate
Step 7: Restart the Application
- To restart your application:
- Go to cPanel > Setup Python App.
- Restart the application to apply the changes.
Step 8: Access Your Application
- Finally, visit the Application URL you specified to see your Django app in action (e.g., https://yourdomain.tld).
Step 1: Export Environment to Run npm Commands
Step 2: Create Main App Directory
Step 3: Install Angular CLI
Step 4: Create Angular App
Step 5: Build Angular App
Step 6: Create Express.js Server
Step 7: Initialize Node.js and Create package.json
Step 8: Install Express.js
Step 9: Set Up Node.js App in cPanel
Step 10: Access Your Application
- To ensure that the necessary Node.js binaries are available, start by exporting the required environment variable.
export PATH=/opt/alt/alt-nodejs20/root/usr/bin:$PATH
Step 2: Create Main App Directory
- Next, create a directory for your application in your home directory.
            mkdir my-angular-app

            cd my-angular-app
Step 3: Install Angular CLI
- Install the Angular CLI globally.
npm install @angular/cli
Step 4: Create Angular App
- Create a new Angular application using the Angular CLI.
            npx @angular/cli new client

            cd client
Step 5: Build Angular App
- Build the Angular application for production.
            npx ng build --configuration production

            cd ..
Step 6: Create Express.js Server
- Create the server.js file:
vi server.js
- Add the following code to server.js:
            const express = require('express');

            const path = require('path');


            const app = express();

            const PORT = process.env.PORT || 5000;


            // Serve static files from the Angular app

            app.use(express.static(path.join(__dirname, 'client/dist/client/browser')));


            // API endpoint example

            app.get('/api/greeting', (req, res) => {

              res.json({ message: 'Hello from the backend!' });

            });


            // The "catchall" handler: for any request that doesn't match the above, send back Angular's index.html file.

            app.get('*', (req, res) => {

              res.sendFile(path.join(__dirname, 'client/dist/client/browser/index.html'));

            });


            app.listen(PORT, () => {

              console.log(Server is running on port ${PORT});

            });
- Save and exit the editor by pressing :wq.
Step 7: Initialize Node.js and Create package.json
- Initialize your Node.js project to create a package.json file.
- Initialize Node.js:
npm init -y
Step 8: Install Express.js
- Install the Express.js framework to handle the server-side logic.
npm install express
Step 9: Set Up Node.js App in cPanel
- Configure the Node.js application in cPanel.
- Go to the "Setup Node.js App" in cPanel.
- Click on "Create Application".
- Fill in the application details:
- Node.js Version: 20.14.0
- Application Mode: Production
- Application Root: /home/CPUSER/my-angular-app
- Application URL: yourdomain.tld
- Application Startup File: server.js
- Click on "Create".
Step 10: Access Your Application
- Finally, visit the Application URL you specified to see your Angular app in action (e.g., https://yourdomain.tld).
Conclusion
By leveraging Register.lk's new Core Hosting Packages, you can easily deploy and manage powerful Node.js, Ruby, and Python-based applications on cPanel. These packages provide the flexibility and features of VPS hosting while maintaining the simplicity of shared hosting. With root/shell access, setting up and running modern web applications becomes a seamless process. By following this guide, you'll be well-equipped to create dynamic, scalable applications that meet your development needs and delight your users. Happy coding!If you need additional support or wish to upgrade your hosting package to a core hosting package, you can always contact the register.lk support team.
 Written by: Register.lk Support Team


