Live Chat

Domain Scan

(empty)

Login
Free Remote MongoDB Setup for Your Website
(15-jan-2025)
If you're running a Node.js application on a cPanel hosting environment and need to work with MongoDB, MongoDB Atlas offers an excellent solution. MongoDB Atlas provides a free tier as well as premium plans for more advanced use cases. The free tier is great for smaller applications, allowing you to remotely connect and manage your data without needing to install MongoDB on your server. In this guide, we'll explore how to integrate MongoDB Atlas with your Node.js application hosted on cPanel. We'll use Mongoose, a popular ODM (Object Data Modeling) library for Node.js, to simplify working with MongoDB. By following this step-by-step process, you'll be able to set up MongoDB Atlas, configure your Node.js app, and start managing your data efficiently in a cloud environment.
MongoDB vs MySQL: Which One to Choose?
When deciding between MongoDB and MySQL, it's essential to consider your application's data model and performance needs. MongoDB is a NoSQL database that stores data in flexible, JSON-like documents, making it ideal for unstructured or semi-structured data. This is particularly useful for applications that require quick iterations and schema changes. On the other hand, MySQL is a relational database that stores data in structured tables, providing consistency and ensuring data integrity through relationships and transactions.
For most modern web applications, MongoDB offers better scalability and flexibility, especially when dealing with large datasets or real-time data. However, if your application requires strict ACID compliance (atomicity, consistency, isolation, durability) and complex joins, MySQL might be more appropriate.
In this guide, we'll focus on integrating MongoDB Atlas, which provides a cloud-based, flexible, and scalable solution for modern application development.
Prerequisites
Before we dive in, ensure you have the following:
- Access to cPanel with Terminal access enabled. The Core Hosting packages and VPS Hosting packages at Register.lk can fulfill the requirement for terminal access.
- Node.js installed on your cPanel account. (In Core Hosting packages, Node.js application is already installed. For VPS packages, you may need to install it manually if it hasn't been installed already.)
Step 1: Set Up MongoDB Atlas
1.1 Create a MongoDB Atlas Account
Alright, let's begin by creating a MongoDB Atlas account!- Visit the MongoDB Atlas website.
- Sign up for an account by providing the required details.
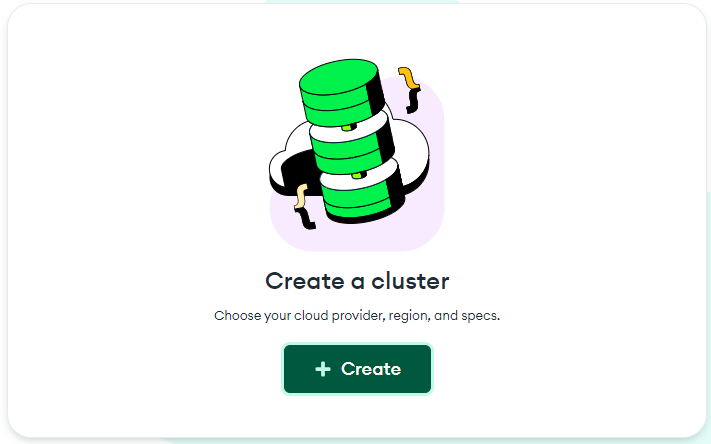
1.2 Create a Cluster
- Log in to your MongoDB Atlas account.
- Click on "Build a Cluster" and follow the wizard. Select "Shared Clusters" for the free tier option.
- Click "Create Cluster".
1.3 Create a Database
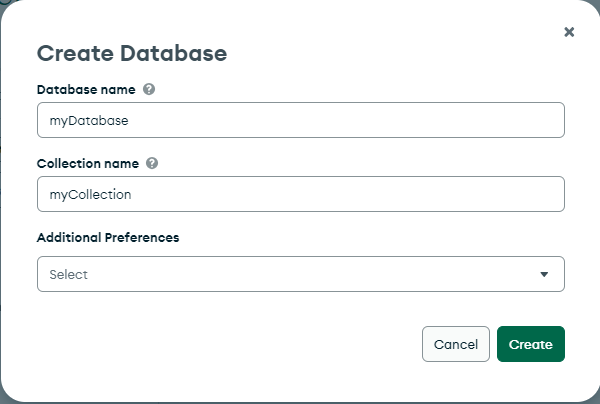
Before creating a database user, let's create the actual database.- In the left sidebar, navigate to "Database".
- Click on "Create Database".
- Name your database (e.g:
myDatabase). - Select a cluster, and complete the setup.
1.4 Create a Database User
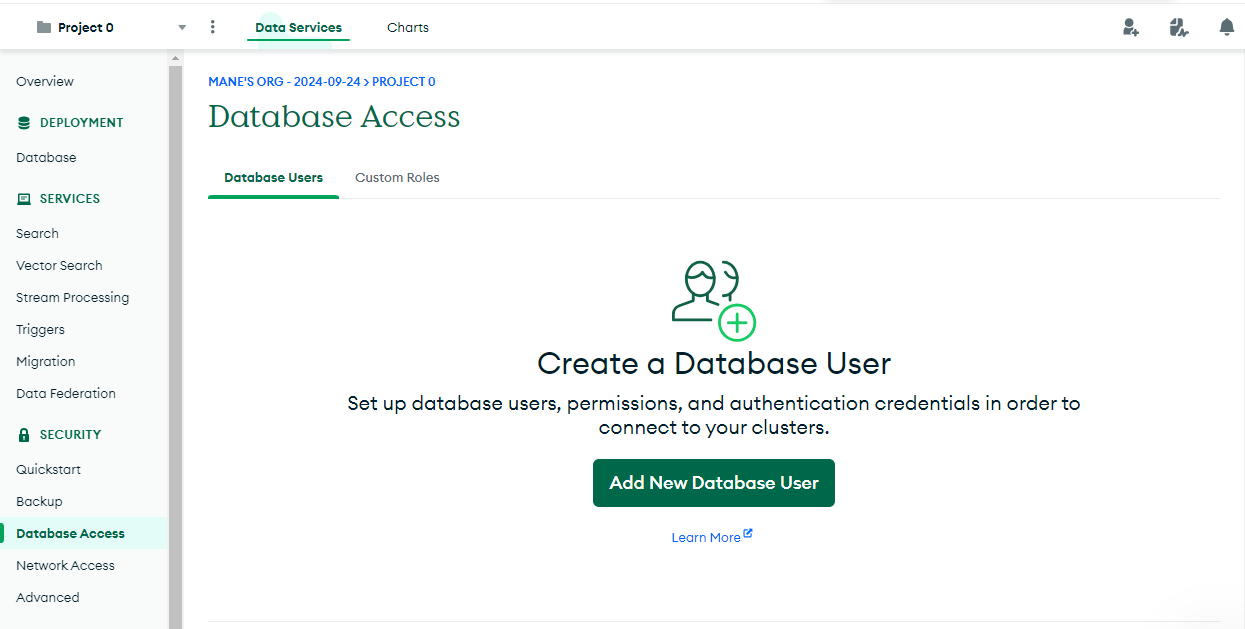
- In the left sidebar, navigate to "Database Access".
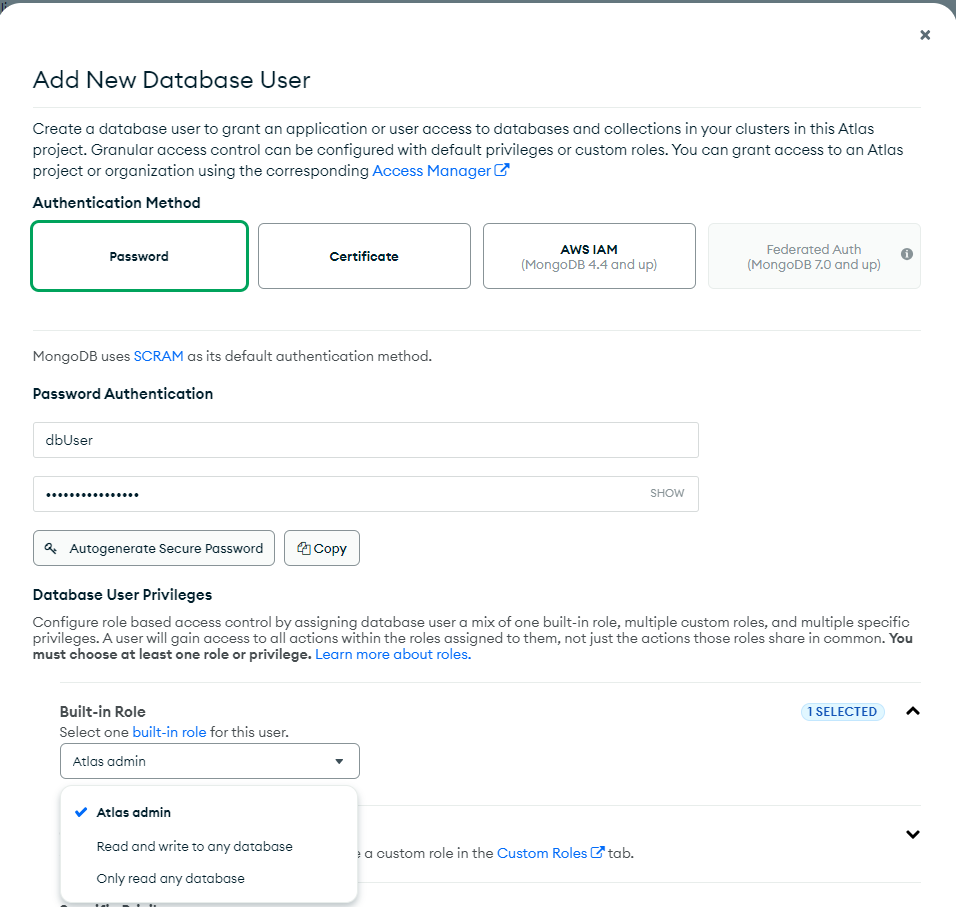
- Click on "Add New Database User".
- Set a username (e.g:
dbUser) and a secure password. - Assign "Atlas admin" privileges.
- Click "Add User".
1.5 Whitelist Your IP Address
- Go to "Network Access" in the left sidebar.
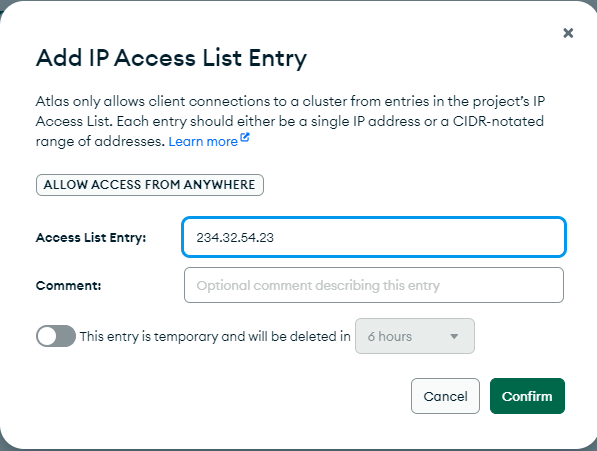
- Click "Add IP Address".
-
Whitelist Your IP Address
To whitelist your hosting IP in MongoDB Atlas, log in to your cPanel account, navigate to the General Information panel on the right side and locate your Shared/Dedicated IP Address to use in the IP whitelist. If you prefer to allow access from any IP (not recommended for production), you can enter
0.0.0.0/0. - Click "Confirm".
1.6 Get the Connection String
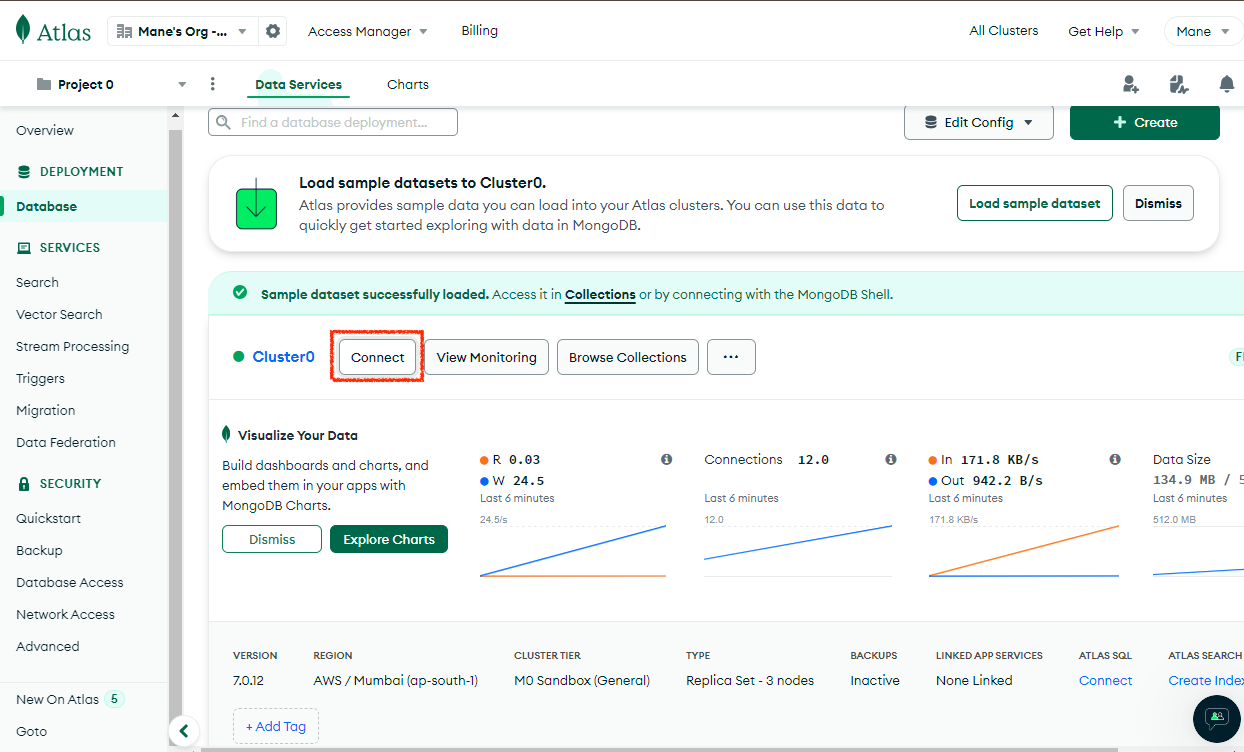
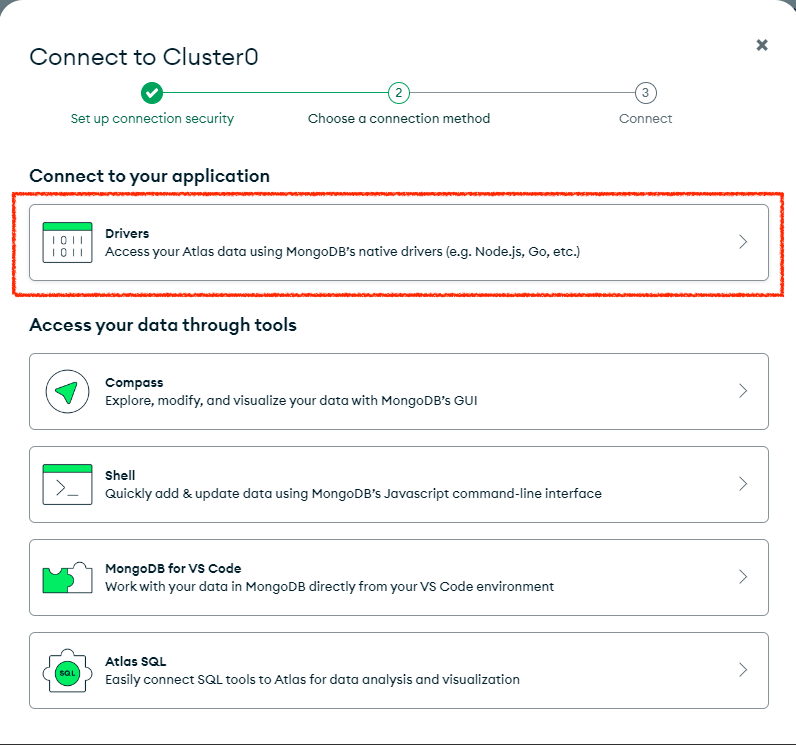
- Return to "Deployment" > "Database" > Clusters"" and click "Connect".
- Select "Connect to your application" > "Drivers".
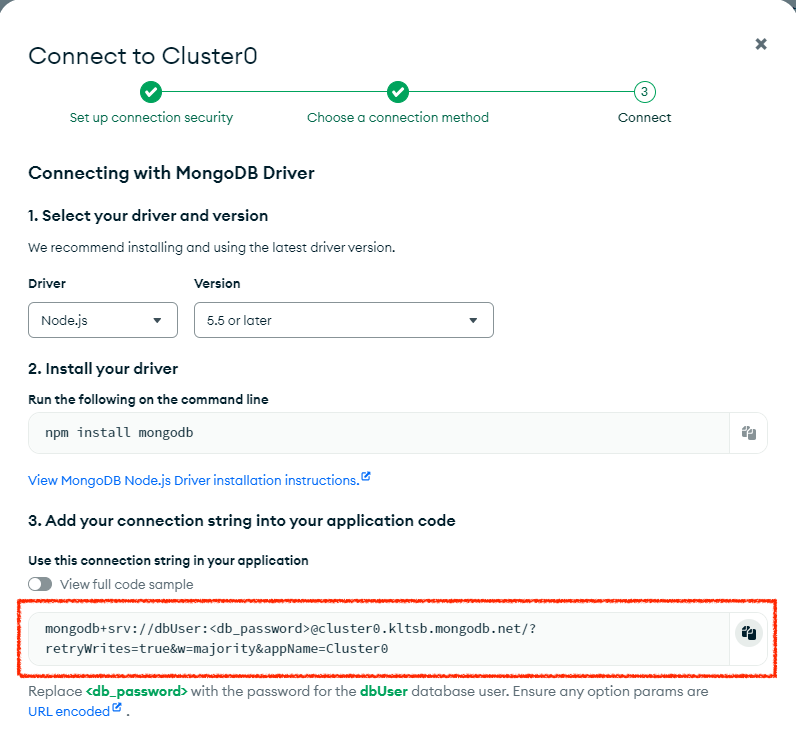
- Ensure the driver is set to Node.js, and select the version that matches or is compatible with your hosting package.
- Copy your connection string and save it somewhere safe, as you will need it in the later steps.
Step 2: Set Up Your Node.js Application on cPanel
Now that your MongoDB Atlas cluster is set up and configured, let's move on to integrating it with your Node.js application. In this section, we'll walk through creating a Node.js project on your cPanel hosting environment, installing the necessary dependencies, and writing the code to connect your app to MongoDB Atlas. Follow these steps closely to ensure a successful connection to your newly created MongoDB cluster.2.1 Set Up Your Node.js Application on cPanel
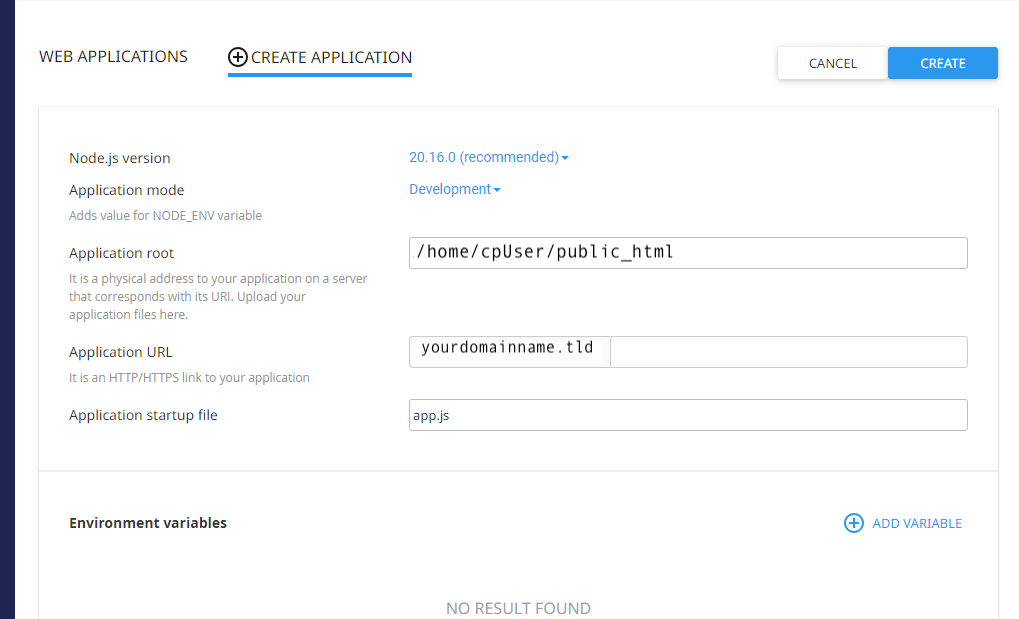
Go to cPanel > Setup Node.js App under the Software section.- Click "Create Application".
- Select the appropriate Node.js version (e.g: 20.x).
- Set Application Mode to "Production".
- In the Application Root, enter your app directory (e.g:
my-node-app). - Enter the Application URL (e.g:
https://yourdomain.com). - For Application Startup File, enter
app.js. - Click "Create".
2.2 Enter the Virtual Environment
After creating the application, copy the virtual environment command provided by cPanel (it looks similar to the following)
2.3 Access cPanel Terminal
- Go back to your cPanel dashboard.
- Navigate to "Terminal" under the Advanced section.
- Run the copied command from the previous step to start the virtual environment.
2.4 Configure Environment for npm Commands
Run the following command to ensure npm commands function properly:export PATH=/opt/alt/alt-nodejs20/bin:/opt/alt/alt-nodejs20/usr/bin:$PATHnodejs20 to match your installed Node.js version.
2.5 Create Application Directory
- Navigate to your home directory:
cd ~ - Create a new directory for your application:
mkdir my-node-app
cd my-node-app
2.6 Initialize Node.js Project
Initialize the project with apackage.json file:
npm init -y2.7 Install Mongoose
Install Mongoose, a popular MongoDB ODM library:npm install mongoose2.8 Install express
Express is a minimal and flexible Node.js web application framework that provides essential features for web and mobile applications.
npm install expressStep 3: Create app.js
Create a new file called app.js:
touch app.jsStep 4: Write the Code in app.js
Now that you have created the app.js file via the terminal, follow these steps to add the necessary code for your Node.js application:
-
Navigate to File Manager:
Go to cPanel > File Manager and locate your application directory (e.g:
public_html/my-node-app). -
Locate the app.js file:
In the application directory, find the file
app.js. -
Edit the File:
Right-click on the
app.jsfile and select Edit from the menu. -
Paste the Following Code:
Replace the existing contents of
app.jswith the code below:JavaScriptconst express = require('express'); const mongoose = require('mongoose'); const app = express(); mongoose.set('debug', true); // Enable Mongoose debugging for detailed logs // Replace with your actual MongoDB connection string const uri = 'mongodb+srv://dbUser:<db_password>@cluster0.39i8i.mongodb.net/?retryWrites=true&w=majority&appName=Cluster0'; // Connect to MongoDB Atlas mongoose.connect(uri, { useNewUrlParser: true, useUnifiedTopology: true }) .then(() => console.log('Connected to MongoDB Atlas')) .catch(err => console.error('Error connecting to MongoDB Atlas:', err)); // Define a Mongoose schema const itemSchema = new mongoose.Schema({ name: String, quantity: Number, price: Number }); // Create a Mongoose model const Item = mongoose.model('Item', itemSchema); // Route to fetch all items from MongoDB app.get('/', async (req, res) => { try { const items = await Item.find(); // Retrieve all items res.json(items); // Send the items as a JSON response } catch (err) { res.status(500).send('Error retrieving items from MongoDB'); } }); // Route to add a new item (example) app.get("/add-item", async (req, res) => { try { const newItem = new Item({ name: 'Banana', quantity: 50, price: 0.5 }); const savedItem = await newItem.save(); res.json({ message: 'Item added successfully', item: savedItem }); } catch (err) { res.status(500).send('Error adding item to MongoDB'); } }); // Listen on the port assigned by cPanel const port = process.env.PORT || 3000; app.listen(port, () => { console.log(`Server running on port ${port}`); }); -
Save the Changes:
After pasting the code, click Save Changes in the top right corner of the editor.
@ becomes %40 , and # becomes %23.
Step 5: Finalize Node.js Application Setup
Now, navigate back to cPanel and go to Setup Node.js App under the Software section.
- Locate your application (e.g:
my-node-app). - Click "Edit" to confirm that the Application Startup File is set to
app.jsand the Application Mode is correct.
5.1 Install Dependencies
After creating the application, click "Run NPM Install" to the Node.js application to install the dependencies listed in package.json.
5.2 Restart the Application
Click "Restart" to apply the changes.
Step 6: Run and Test Your Application
6.1 Check the Application Logs
- In the Application Manager, click "View Logs" to see the output of your application.
- You should see messages similar to:
Connected to MongoDB Atlas
Item saved: { ... }
All items: [ ... ]
6.2 Verify Data in MongoDB Atlas
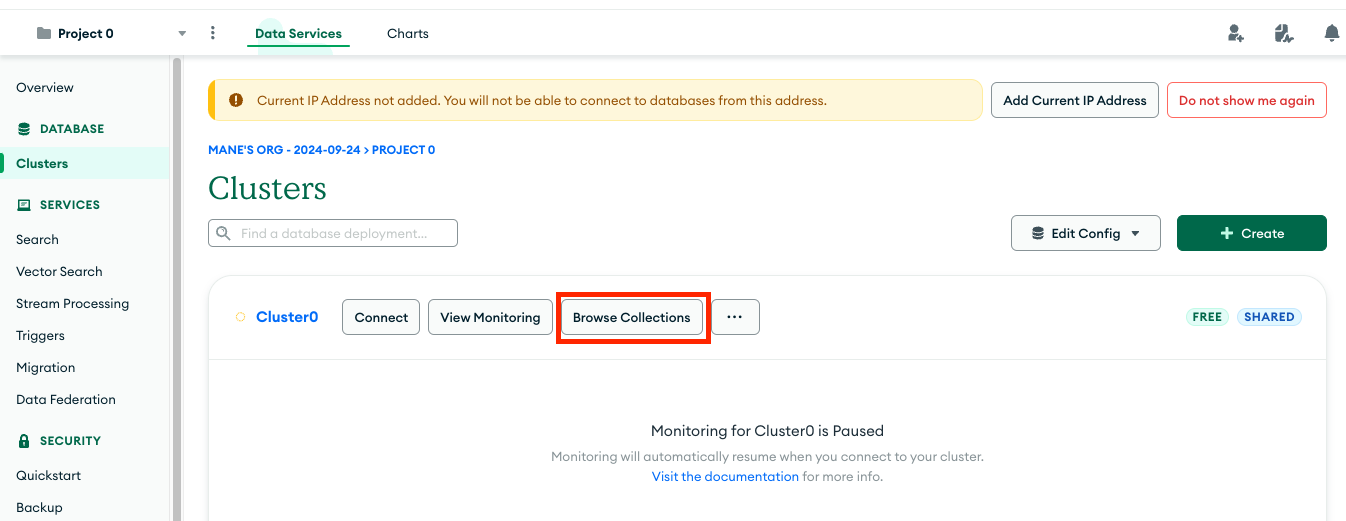
- Log in to your MongoDB Atlas account.
- Click on "Browse Collections".
- Navigate to your database and collection.
- You should see the document(s) inserted by your application.
Conclusion
Congratulations! By following this guide, you've successfully connected your Node.js application to MongoDB Atlas from a cPanel shared hosting environment. You now have a solid foundation to build upon-whether you're developing a simple app or a complex web service.Additional Resources
Feel free to reach out if you have any questions or need further assistance. Happy coding!
 Written by: Register.lk Support Hero - Kesaru


