Live Chat

Domain Scan

(empty)

Login
How to Clear Laravel Cache via Cron Job for Laravel Projects
(28-jan-2025)

When working on a Laravel project, maintaining optimal performance is a top priority. Laravel, one of the most popular PHP frameworks, offers a robust caching system designed to improve the efficiency and speed of your application by storing frequently accessed data. However, as your project evolves, the cache may occasionally become outdated or corrupted, potentially causing performance issues or unexpected behavior. Regularly clearing the cache is an essential part of maintaining the health of your Laravel project. For developers using shared hosting environments, managing cache can be challenging. Shared hosting often comes with significant restrictions, such as the lack of terminal or root access, making it impossible to run artisan commands directly through a command-line interface. Despite these limitations, there's an effective way to automate cache management-using cron jobs. This guide will walk you through the process step by step.
What is Laravel Cache?
Laravel Cache is a powerful feature that temporarily stores frequently accessed data in a fast storage layer, to reduce repetitive database queries or complex computations. By caching this data, Laravel enhances application performance, speeds up response times, and reduces server load, providing a smoother experience for users. Understanding how caching works is essential, but equally important is knowing how to manage it effectively-especially when you need to clear outdated or stale cache to ensure your application reflects the latest changes.Why Use a Cron Job for Cache Clearing?
In shared hosting environments, terminal/root access is often unavailable. Cron jobs provide a powerful alternative to automate system commands like clearing cache, ensuring your application runs smoothly without manual intervention.Step-by-Step Guide to Clear Laravel Cache via Cron Job
- Log in to cPanel
- Access your cPanel account by navigating to "yourdomain.com/cpanel".
- Enter your cPanel credentials to log in.
- Navigate to the Cron Jobs Section
- Scroll down to the Advanced section.
- Click on Cron Jobs to open the cron job management interface.
- Enter the Cache Clearing Command
- In the Command field, input the following command:
/home/CPUSER/public_html/with the full path to your Laravel project directory.- Define the Cron Timing
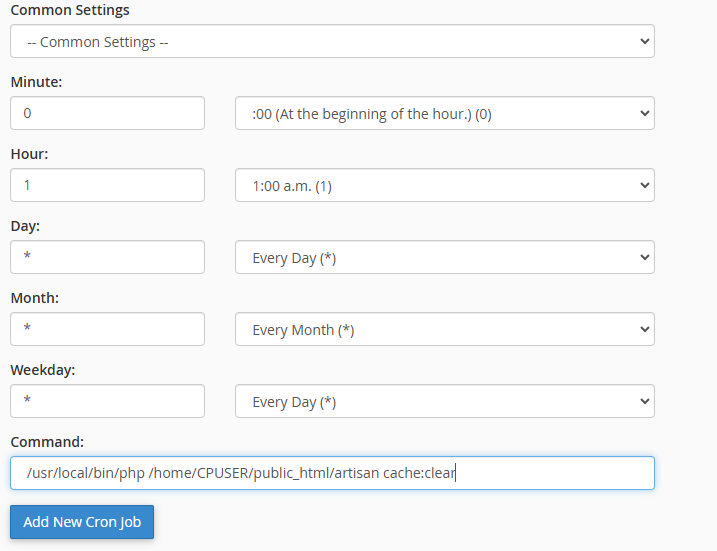
- In the Add New Cron Job section, select a schedule for your cron job.
- Add the Cron Job
- Click on Add New Cron Job to save and schedule it.
/usr/local/bin/php /home/CPUSER/public_html/artisan cache:clearReplace:
Ex: If you need to set up a cron job to clear the Laravel cache every day at 1:00 AM, set the cron timing as shown below:

Wondering how to configure your cron job? Click here to learn.
Tips for Success
Conclusion
Automating Laravel cache clearing through cron jobs ensures that your project remains optimized and operates without disruption. By regularly clearing the cache, you can prevent issues caused by outdated or corrupted files, maintaining the performance and reliability of your Laravel project. This simple yet powerful solution allows developers on shared hosting to manage cache efficiently, ensuring their projects deliver a seamless and efficient user experience.By automating cache clearing with cron jobs, you can ensure your Laravel project remains optimized and performs efficiently, providing a seamless experience for your users.
 Written by: Register.lk Support Hero - Shamendra


