Live Chat

Domain Scan

(empty)

Login
How to Create a Symlink via Cron Job for Laravel Projects
(18-jan-2025)

Creating a symbolic link (symlink) is an essential step when hosting complex applications like Laravel. If you're on shared hosting and lack terminal or root access, you can still create a symlink using a cron job. This guide will walk you through the process step by step.
What is a Symlink?
A symlink, or symbolic link, is a shortcut that points to another directory or file. In Laravel, symlinks are often used to link the storage directory to the public folder, ensuring that files are accessible via the web application.Why Use a Cron Job to Create a Symlink?
In shared hosting environments, terminal access is restricted, and PHP'ssymlink() function may be disabled. A cron job allows you to execute Linux commands, such as creating a symlink, without needing direct terminal access.
Note: Symlink function is disabled on shared hosting packages, so the storage link will not execute during installation.
Step-by-Step Guide to Create a Symlink via Cron Job
- Log in to cPanel
- Access your cPanel account by navigating to "yourdomain.com/cpanel".
- Enter your cPanel credentials to log in.
- Navigate to the Cron Jobs Section
- Scroll down to the Advanced section.
- Click on Cron Jobs to open the cron job management interface.
- Enter the Symlink Command
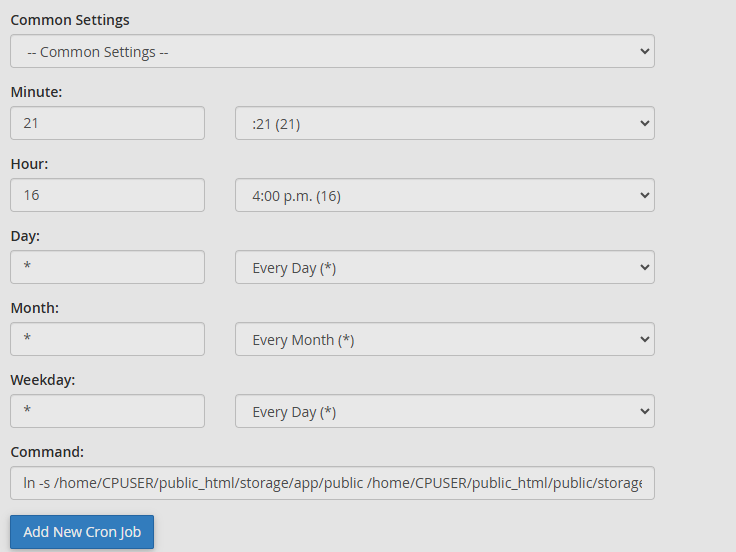
- In the Command field, input the following command:
/home/CPUSER/public_htmlaccording to the installation path- Define the Cron Timing
- In the Add New Cron Job section, select a schedule for your cron job. To execute the command immediately, set it to next minute of current time.
- Add the Cron Job
- Click on Add New Cron Job to save and schedule it.
- Verify the Symlink
- After the execution open File Manager in cPanel and navigate to the destination directory (e.g.,
/public_html/public). - Confirm that the symlink has been created (
/public_html/public/storage).
ln -s /home/CPUSER/public_html/storage/app/public /home/CPUSER/public_html/public/storageReplace:
Ex: If the current time is 16:20 set the cron job to execute at 16:21

Wondering how to configure your cron job? Click here to learn.
Tips for Success
Conclusion
Creating a symlink via a cron job is a practical solution for shared hosting environments where PHP'ssymlink() function is disabled. This method ensures that your application can function correctly without requiring terminal access. Leveraging cPanel's cron job feature makes the process simple and accessible, even for users with limited technical expertise.
By following this guide, you can seamlessly create a symlink for your Laravel project, ensuring optimal functionality even on shared hosting environments.
 Written by: Register.lk Support Hero - Shamendra


