
Live Chat

Domain Scan

(empty)

Login
How to Install Joomla on Your cPanel: A Step-by-Step Guide
(06-sept-2024)

Joomla is a robust content management system (CMS) that simplifies the creation and management of dynamic websites for a wide range of purposes. In this guide, you'll learn how to set up Joomla, including configuring your hosting environment, installing and customizing templates, and enhancing your website with essential plugins. Whether you're new to Joomla or looking to refine your skills, this guide will help you create a fully functional, customized Joomla-powered website.
Common Uses of Joomla
- Content Management: Joomla excels as a content management system, making it easy to organize, edit, and publish content, especially for websites that need frequent updates.
- Corporate Websites: With advanced user permissions and scalability, Joomla is perfect for corporate websites requiring various access levels for employees, partners, and customers.
- Community Portals: Joomla's user management features are ideal for creating community-focused websites like forums and social networks.
- Educational Websites: Schools and universities use Joomla to manage large amounts of content and user roles efficiently.
- E-commerce Websites: Joomla can be extended with e-commerce solutions, making it a strong platform for online stores with product catalogs and payment gateways.
- Nonprofit and Government Websites: Joomla's flexibility and multilingual support suit nonprofit organizations and government agencies needing informative, accessible websites.
Hosting Requirements for Joomla
Before setting up Joomla, it's crucial to ensure that your hosting environment meets the system requirements. You can find the latest technical requirements for Joomla by visiting the official Joomla documentation at Joomla Technical RequirementsOnce you've reviewed the requirements, you'll need to customize your hosting environment accordingly. This includes setting the correct PHP version and optimizing other PHP settings for the best performance.
To ensure that Joomla runs smoothly on your website, it's important to choose a hosting package that meets your website's needs. Here are our recommended hosting packages:
- Core Hosting (Recommended): Ideal for small to medium-sized websites, Core Hosting offers the necessary resources to run Joomla efficiently.
- VPS Packages: For larger websites or those needing more control, VPS packages provide the scalability and customization options required for advanced Joomla setups.
Setting Up Your Hosting Environment for Joomla
Now that you understand the hosting requirements, let's move on to setting up your hosting environment to ensure it's fully compatible with Joomla. This involves making some essential adjustments in cPanel.1. Change PHP Version Using MultiPHP Manager
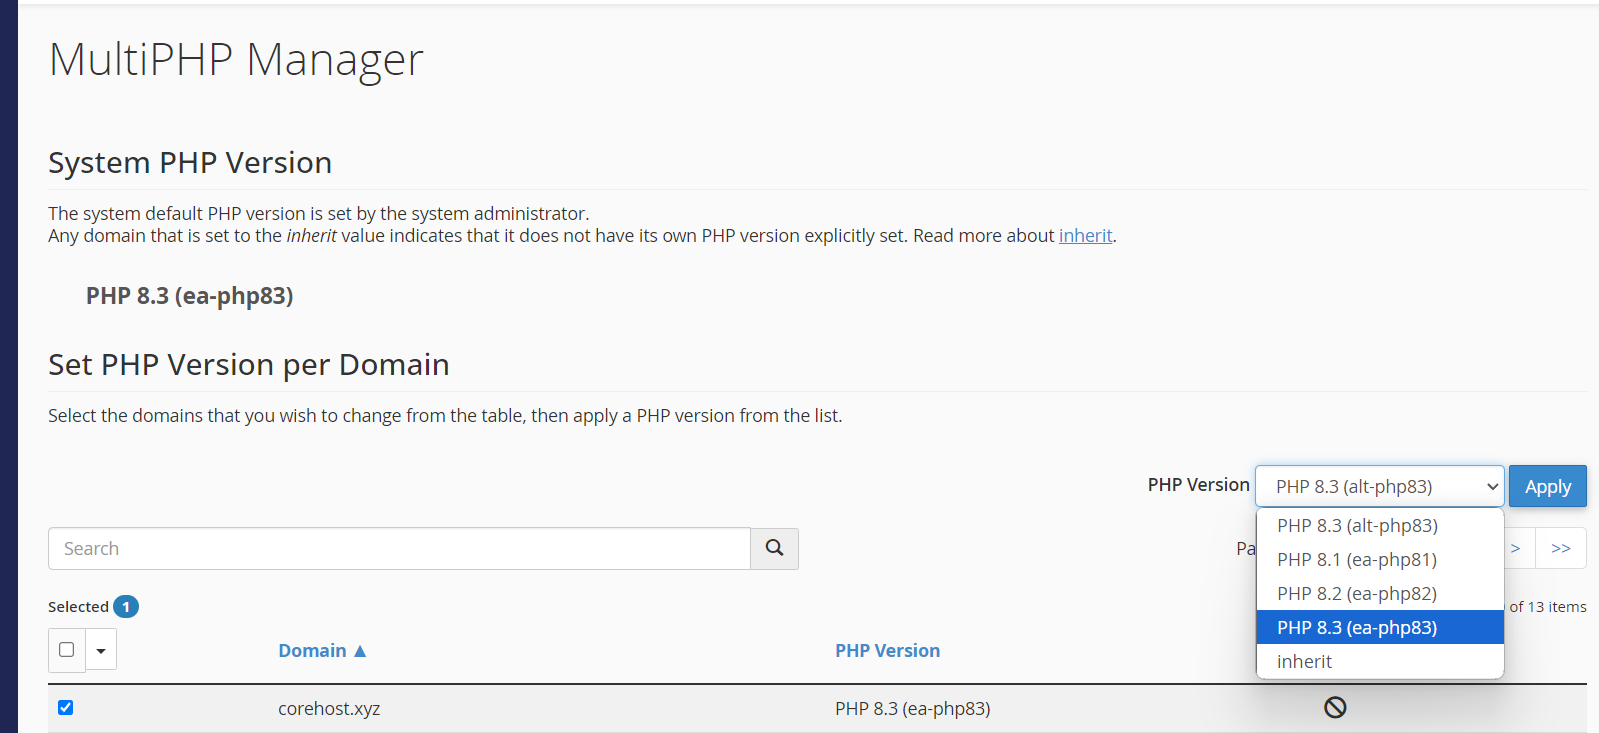
The first step is to set the correct PHP version. Joomla 5 requires the latest compatible PHP version for optimal performance and security. Here's how you can do it:- Log in to cPanel: Navigate to the "Software" section and click on "MultiPHP Manager".
- Select Domain: Choose the domain or subdomain where Joomla will be installed.
- Select PHP Version: Always select the latest compatible PHP version. For instance, choose PHP 8.3 (ea-php83) as the latest available version.
- Apply Changes: Click "Apply" to save the changes.
2. Optimize PHP Settings Using MultiPHP INI Editor
Next, we'll tweak some PHP settings to enhance Joomla's performance:- Memory Limit: Set this to at least 128M. For larger websites, consider increasing it to 256M.
- Upload Max Filesize: Adjust this to 64M or higher to handle larger files.
- Max Execution Time: Set this to 300 seconds to avoid timeouts during lengthy processes.
- Post Max Size: Match this to your upload max filesize, setting it at 64M or higher.
Installing Joomla
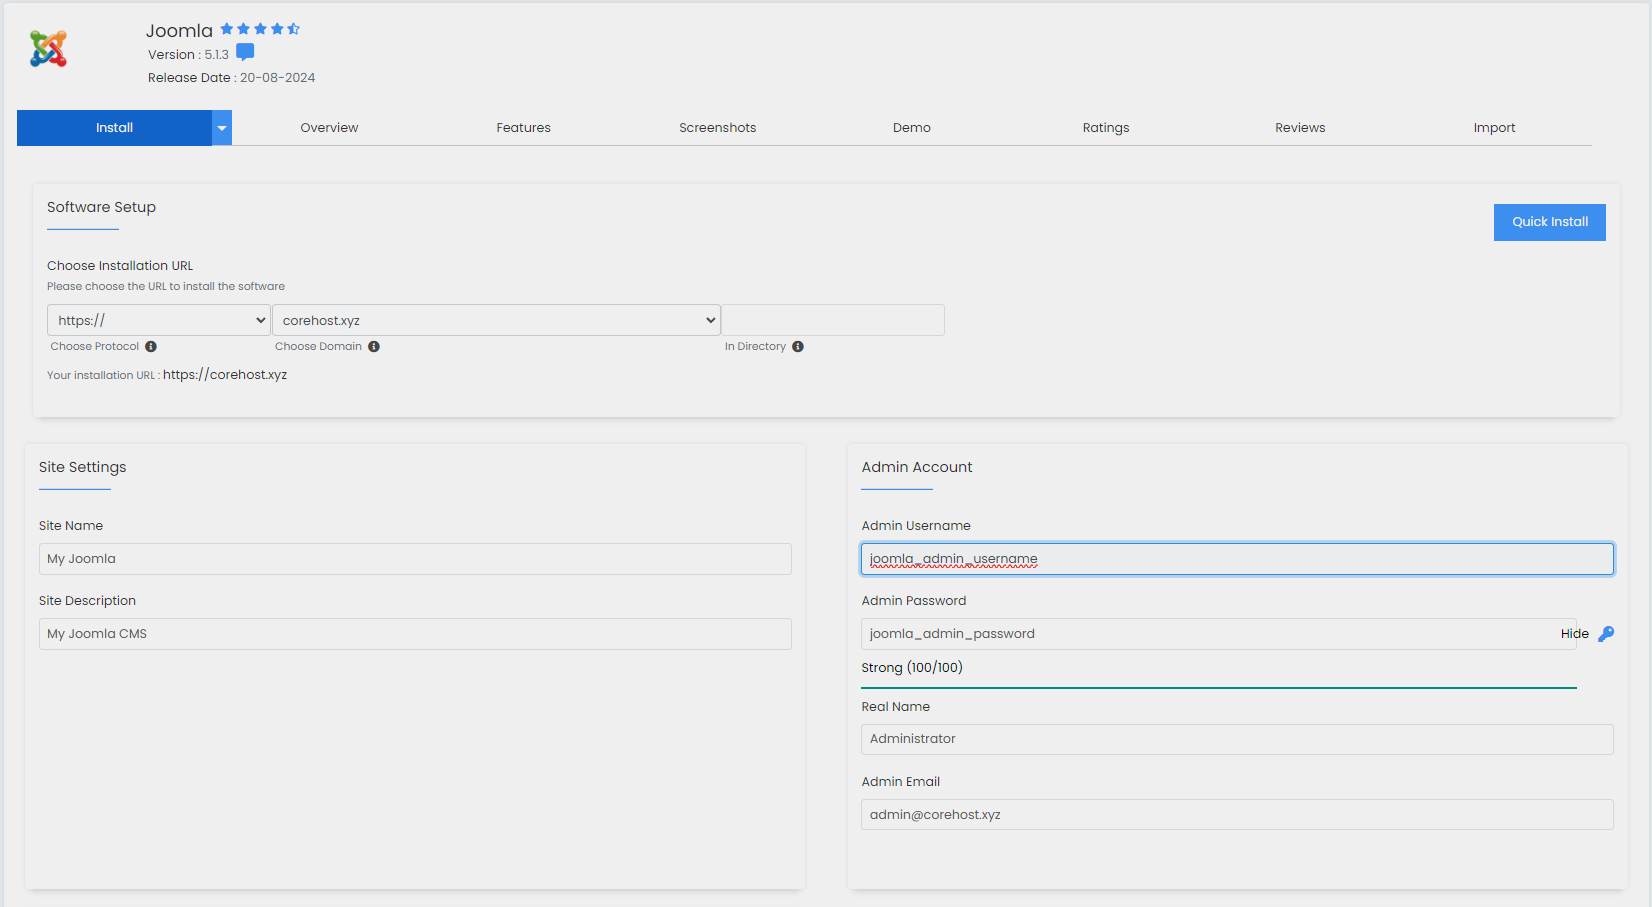
With your hosting environment set up, the next step is installing Joomla itself. Here's how you can do it through cPanel's Softaculous App Installer:- Log in to cPanel: Access the Softaculous App Installer from the Software section.
- Search for Joomla: In the Softaculous dashboard, type "Joomla" into the search bar and click on it.
- Install Joomla:
- Choose Protocol: Select either HTTP or HTTPS. Always select HTTPS for secure communication.
- Domain: Choose the domain where you want Joomla installed.
- Directory: Leave this blank to install Joomla in the root directory, or specify a subdirectory.
- Admin Account: Set your admin username and password. Make sure to save these credentials for future reference.
- Click Install: Begin the installation process.
How to Install a Joomla Template
Templates are essential for defining the appearance and layout of your Joomla site. Before proceeding with the installation, you need to have a template ready. This can be either a custom-designed template or one downloaded from a third-party provider. There are many websites offering Joomla templates tailored to different types of websites. Make sure the template you choose is compatible with Joomla 5.Once you've designed or downloaded a suitable template, follow these steps to install it:
1. Access the Joomla Dashboard
- Step 1: Open your web browser and navigate to the Joomla Administrator area by entering
yourdomain.com/administratorin the address bar. Replaceyourdomain.comwith the domain name where you installed Joomla. - Step 2: Enter your administrator username and password to log in to the Joomla Dashboard.
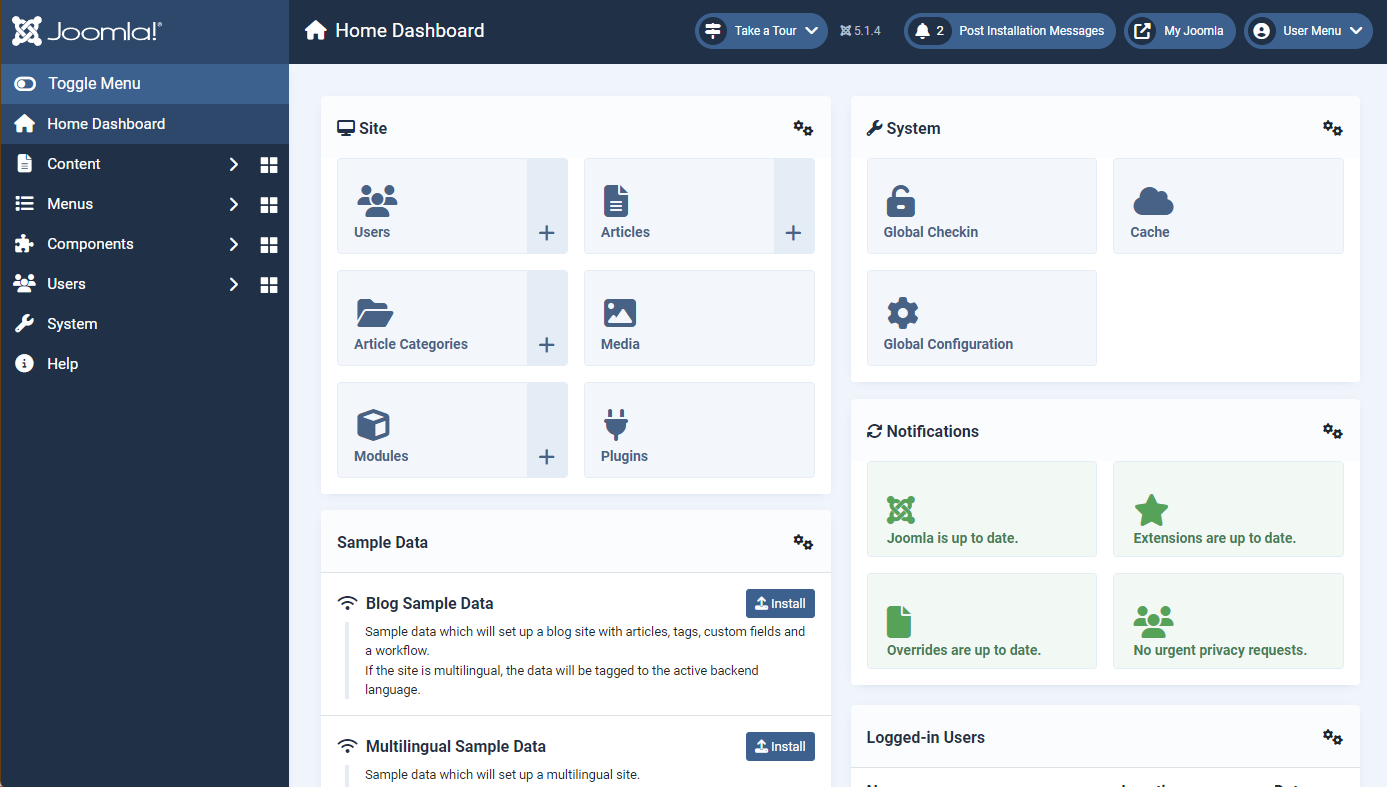
If you encounter a 404 error instead of the dashboard page, this issue might be due to improper URL rewriting. To fix this, go to your cPanel > File Manager. Navigate to the root directory where Joomla is installed. Find the file named
.htaccess.txt and rename it to .htaccess
2. Navigate to the Template Installation Section
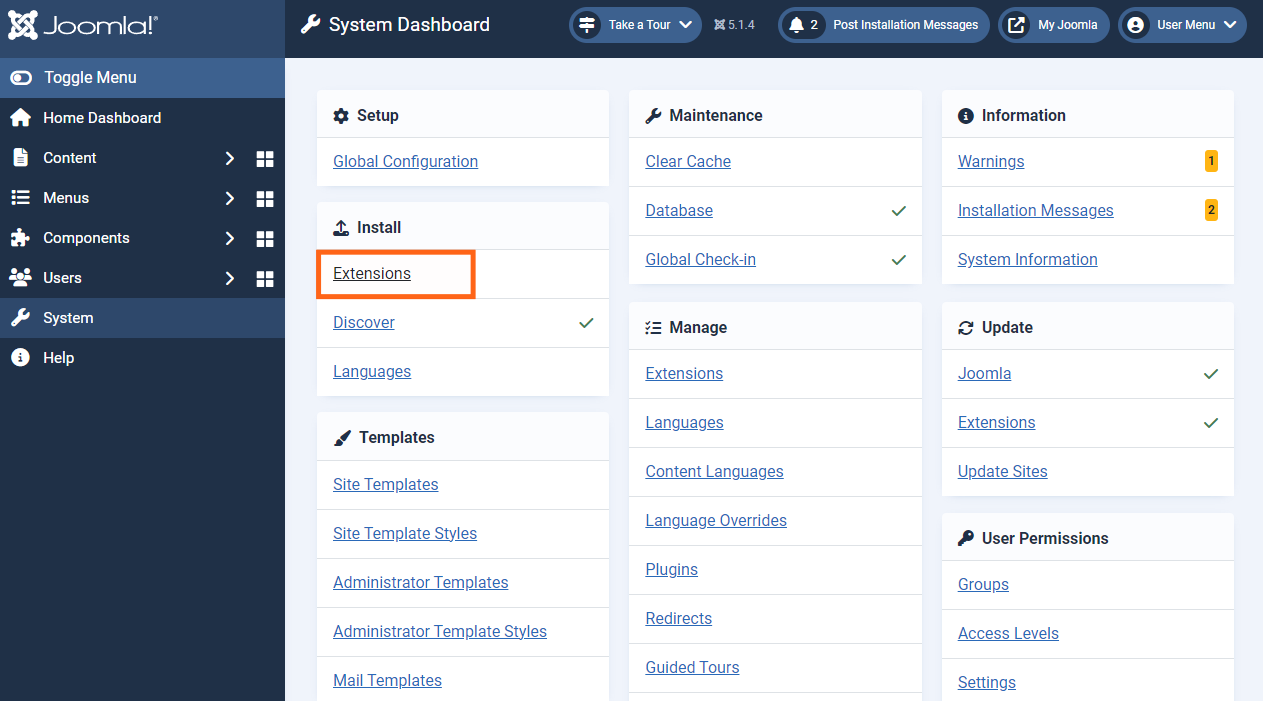
- Step 1: Click on "System" in the sidebar to access the system management tools.
- Step 2: Under the "Install" section, click on "Extensions" to proceed to the extensions installation page. This section allows you to install not only templates but also plugins, modules, and components.
3. Install a New Template
Uploading a Template Package:
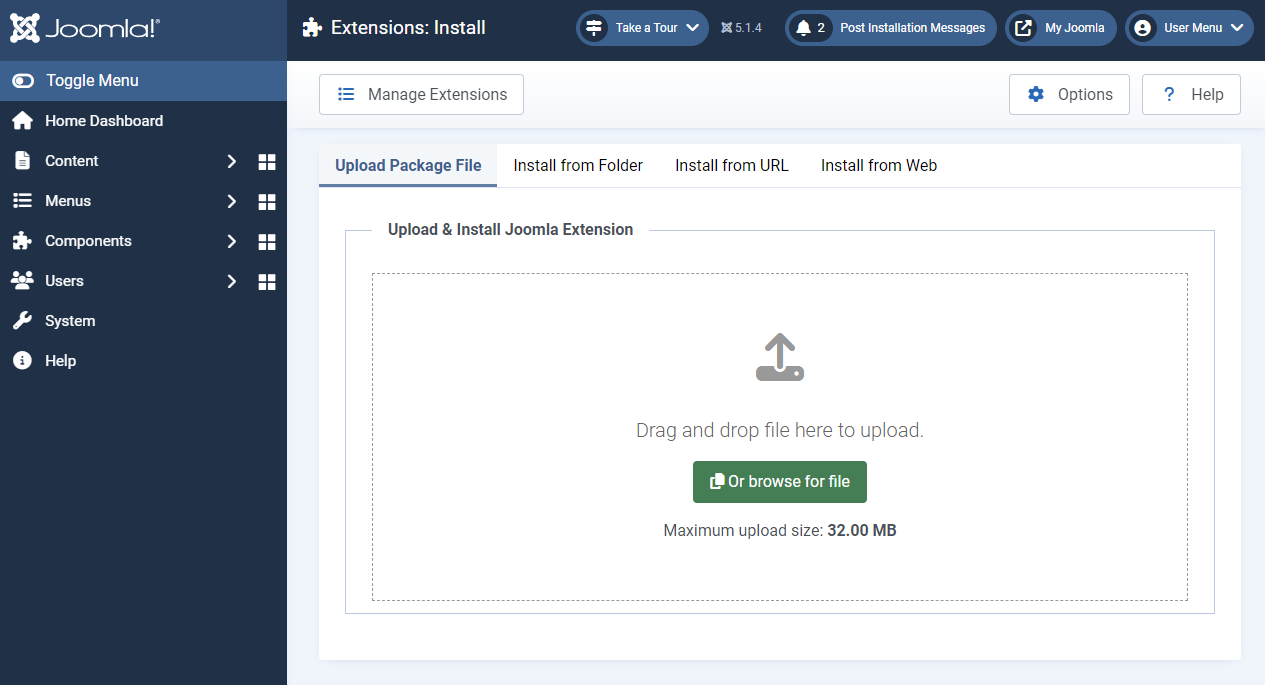
- Step 1: On the "Install Extensions" page, you'll see multiple tabs for different installation methods. Click on the "Upload Package File" tab.
- Step 2: Click the "Or browse for file" button, which opens a file selection dialog. Navigate to the location of the
.zipfile for the template you wish to install from your computer. - Step 3: Select the
.zipfile and click "Open". - Step 4: After selecting the file, click "Upload & Install". Joomla will automatically upload the template package and install it. If successful, you'll see a confirmation message indicating that the template has been installed.
Note:
When selecting a template, ensure that it is compatible with Joomla 5, as not all templates may have been updated to support this version yet.
4. Set the Template as Default
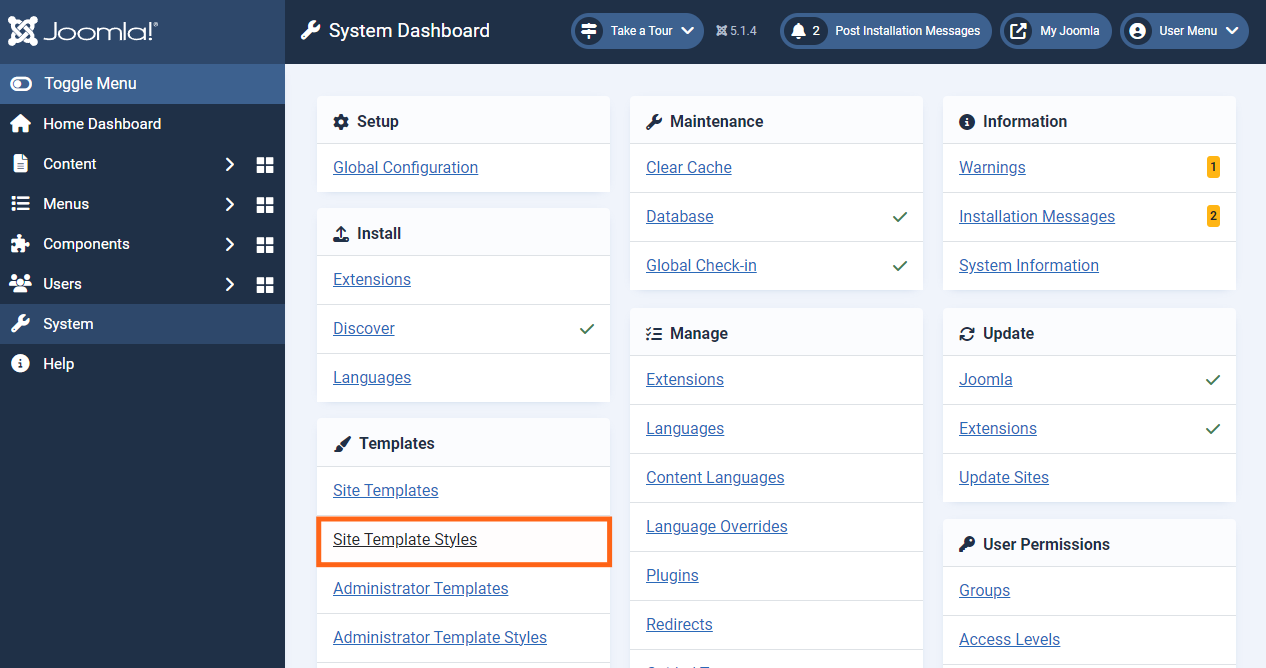
- Step 1: After installing the template, navigate back to the "System" menu.
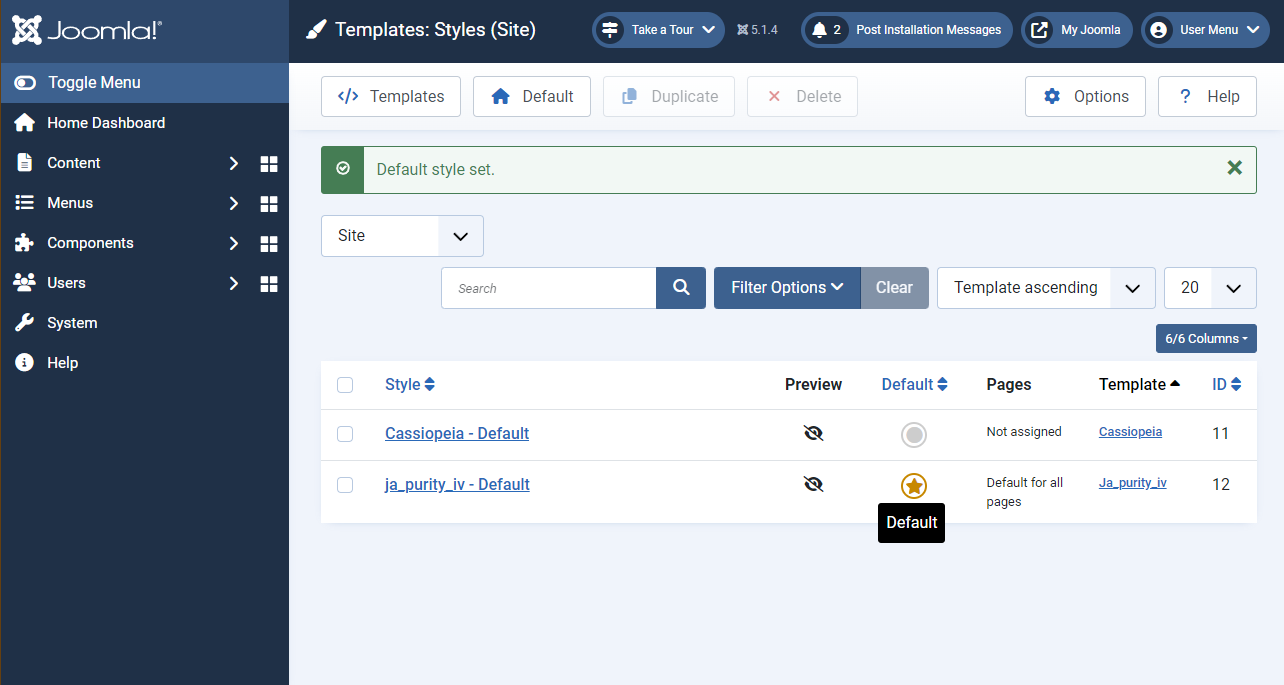
- Step 2: Under the "Templates" section, click on "Site Template Styles." This section lists all the templates installed on your website.
- Step 3: Find the newly installed template in the list. To set it as the default template for your website, click the star icon next to its name. The star will turn yellow, indicating that this template is now the default.
Note:
Some templates may require specific plugins to be activated in order to function correctly. After setting your template as the default:
- Navigate to System > Manage > Plugins.
- Search for and enable any plugins associated with the template you installed.
5. Customize the Template
- Step 1: To modify the template's settings, still in the "Site Template Styles" section, click on the name of the template you just set as default.
- Step 2: This will take you to the template's customization panel, where you can adjust various aspects such as layout, color schemes, typography, and more.
- Step 3: Depending on the template, you might also have options to add custom CSS, configure module positions, and modify other template-specific settings.
6. Preview and Fine-Tune Your Website
- Step 1: After setting and customizing the template, preview your website to ensure it looks the way you want. Navigate to your website's front end by typing your domain name (
yourdomain.com) in the browser. - Step 2: Review the website's appearance. If you need to make additional adjustments, return to the template customization panel in the Joomla dashboard.
- Step 3: Once satisfied with the design, save all changes and ensure the template is properly configured to meet your website's requirements.
Enhancing Joomla with a Popular Plugin
To maximize Joomla's potential, it's a good idea to install additional plugins. One of the most popular and useful plugins is JCE (Joomla Content Editor). It enhances Joomla's default content editor, giving you advanced tools for managing and formatting content, which is especially helpful for corporate websites, community portals, and educational websites.Here's how to install and activate JCE:
Go to Extensions Installation:
- Step 1: In the Joomla dashboard, click on "System" from the sidebar menu.
- Step 2: Under the "Install" section, click on "Extensions".
Install JCE:
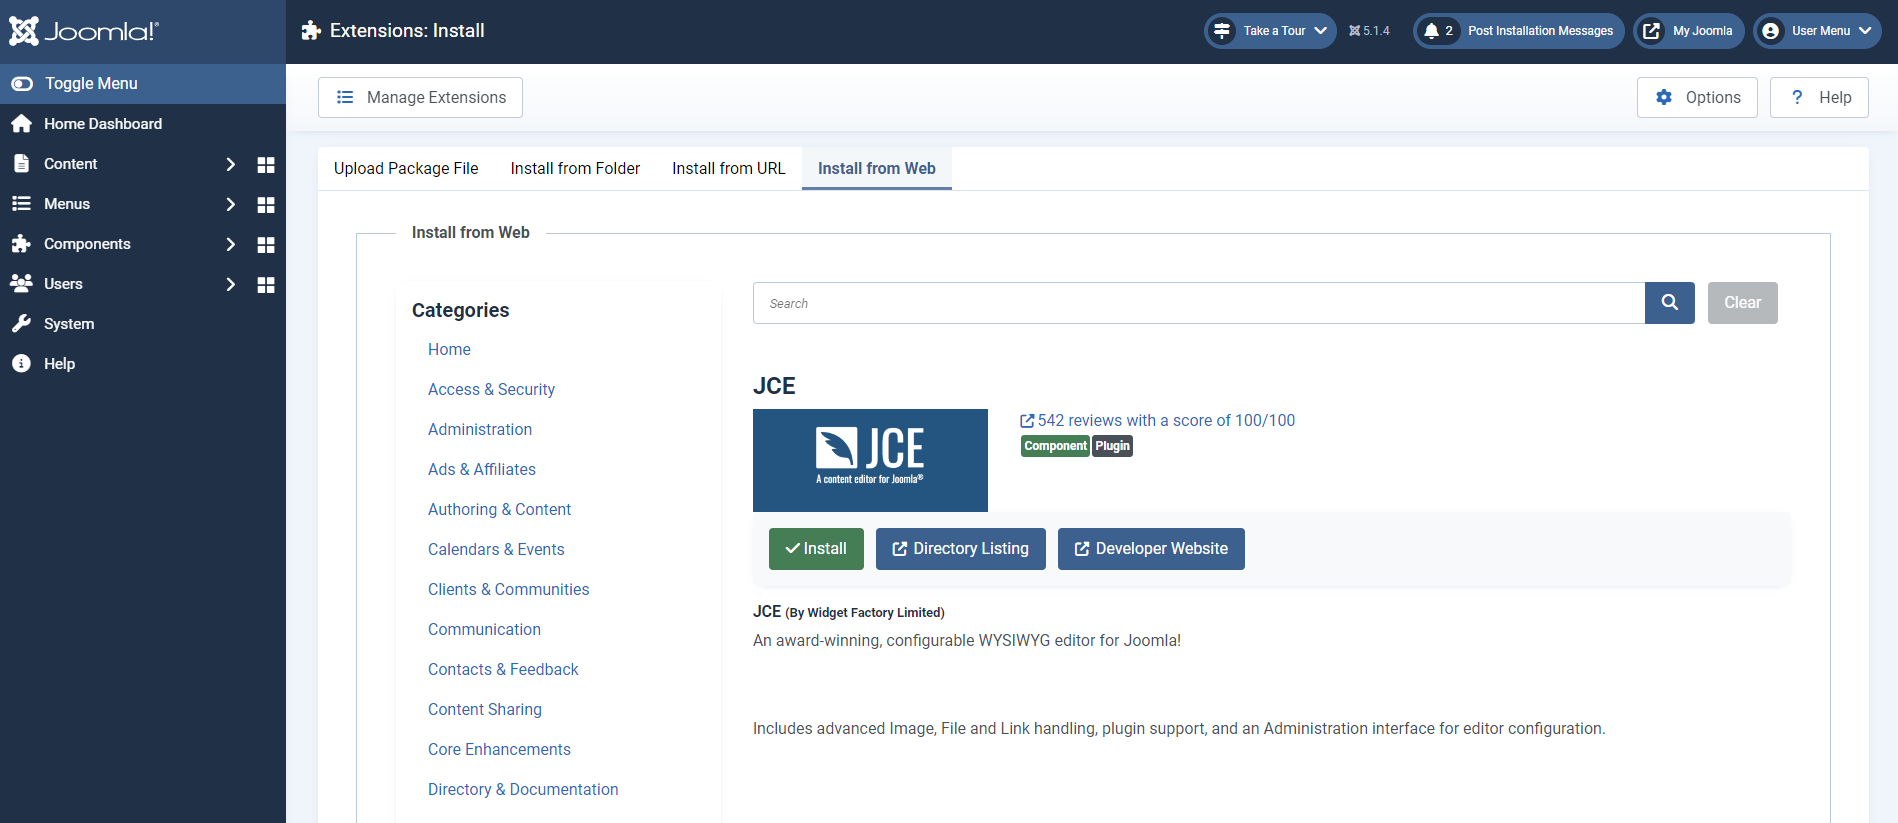
- Upload Package File: If you have the JCE installation package (
.zip), click on "Upload Package File". Drag and drop the file or browse your computer to select it. - Install from Web: Alternatively, click on "Install from Web" and search for "JCE". Click "Install" to proceed.
Activate the Plugin:
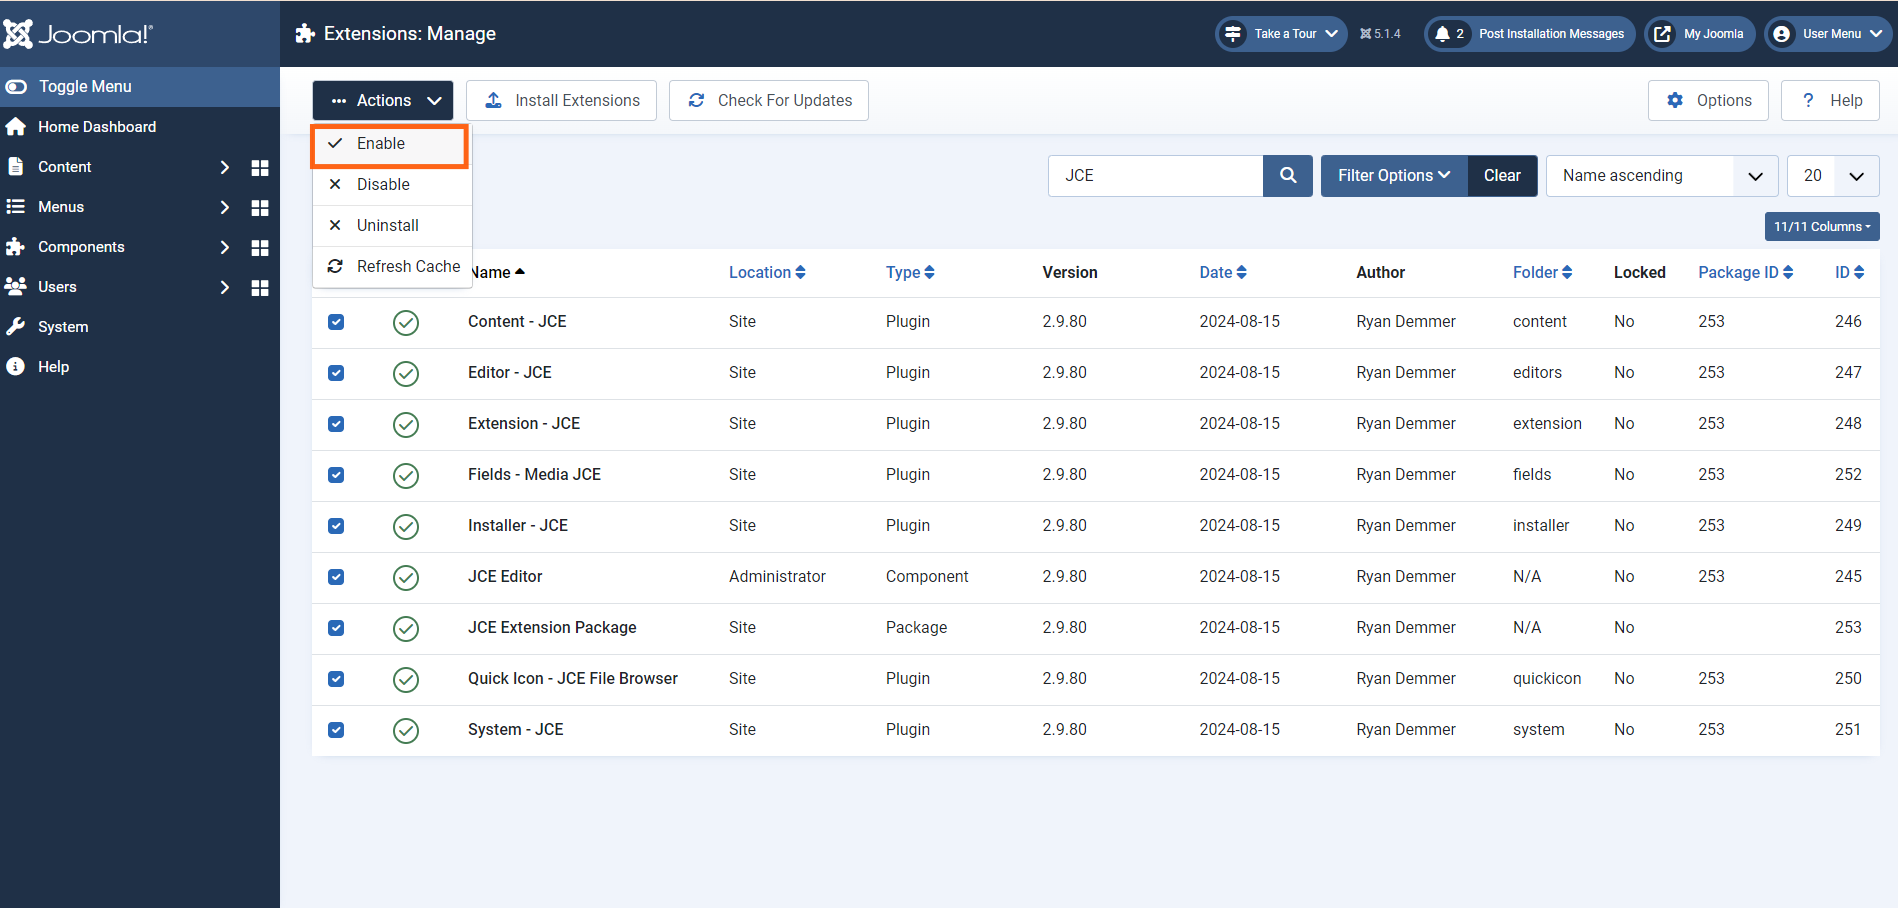
- Step 1: After installation, go to "System" > "Manage" > "Extensions" to view installed plugins.
- Step 2: Ensure that JCE is enabled. If it isn't, select it and click "Enable".
Configure JCE:
- Step 1: Navigate to the "Components" menu in the Joomla dashboard.
- Step 2: Click on "JCE" to start configuring your editor settings to suit your needs.
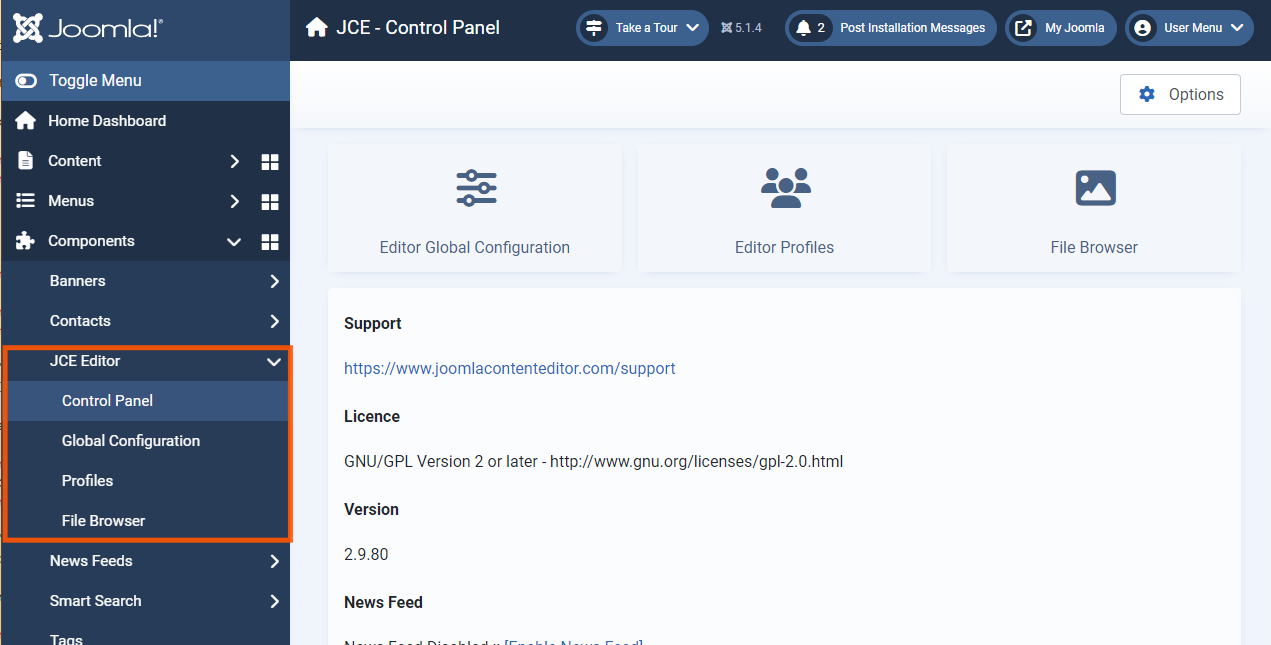
With JCE installed, managing your Joomla content becomes a more powerful and flexible experience.
Conclusion
Setting up Joomla on your cPanel empowers you to create a dynamic and customized website, whether it's for business, education, or e-commerce. By following this guide, you can seamlessly configure your hosting environment, install and customize templates, and enhance your site with essential plugins, maximizing Joomla's full potential. With its powerful features and flexibility, Joomla provides everything you need to build a professional and engaging website tailored to your specific needs.Setting up Joomla correctly not only enhances your website's functionality but also ensures a smooth and efficient user experience.
 Written by: Register.lk Support Hero - Kesaru


