
Live Chat

Domain Scan

(empty)

Login
Modifying Your Local Hosts File to View Your Website Without a Domain Name
(22-aug-2024)

Ever wanted to check out your website on the server before the domain is live? Whether you're in the midst of domain propagation or simply haven't registered a domain name yet, you don't need to wait to see your site in action. By modifying your local hosts file, you can easily map your server's IP address to your chosen domain name on your computer. This tweak is a powerful tool for web developers and website owners, especially when testing or migrating sites. Here's a step-by-step guide to help you get it done on different operating systems.
What Is a Hosts File and Why Modify It?
The hosts file is a simple text file that exists on your computer. It serves as a local map that links domain names to IP addresses. Normally, when you enter a web address into your browser, it checks the DNS (Domain Name System) to find the corresponding IP address. However, by modifying the hosts file, you can tell your computer to look at a specific IP address for a given domain name, bypassing the DNS. This is particularly useful when your domain name isn't yet live, or you want to test changes on a server without affecting the live site.NOTE: For this to work, you must first purchase a hosting package under the domain name that you plan to update in the hosts file. Without an active hosting package, the IP address you assign won't point to a valid website.
Understanding IP Resolution: Hosts File vs. DNS Lookup
Here's a quick visual guide to help you understand how the hosts file works in comparison to DNS lookup, allowing you to view your website locally without a domain name.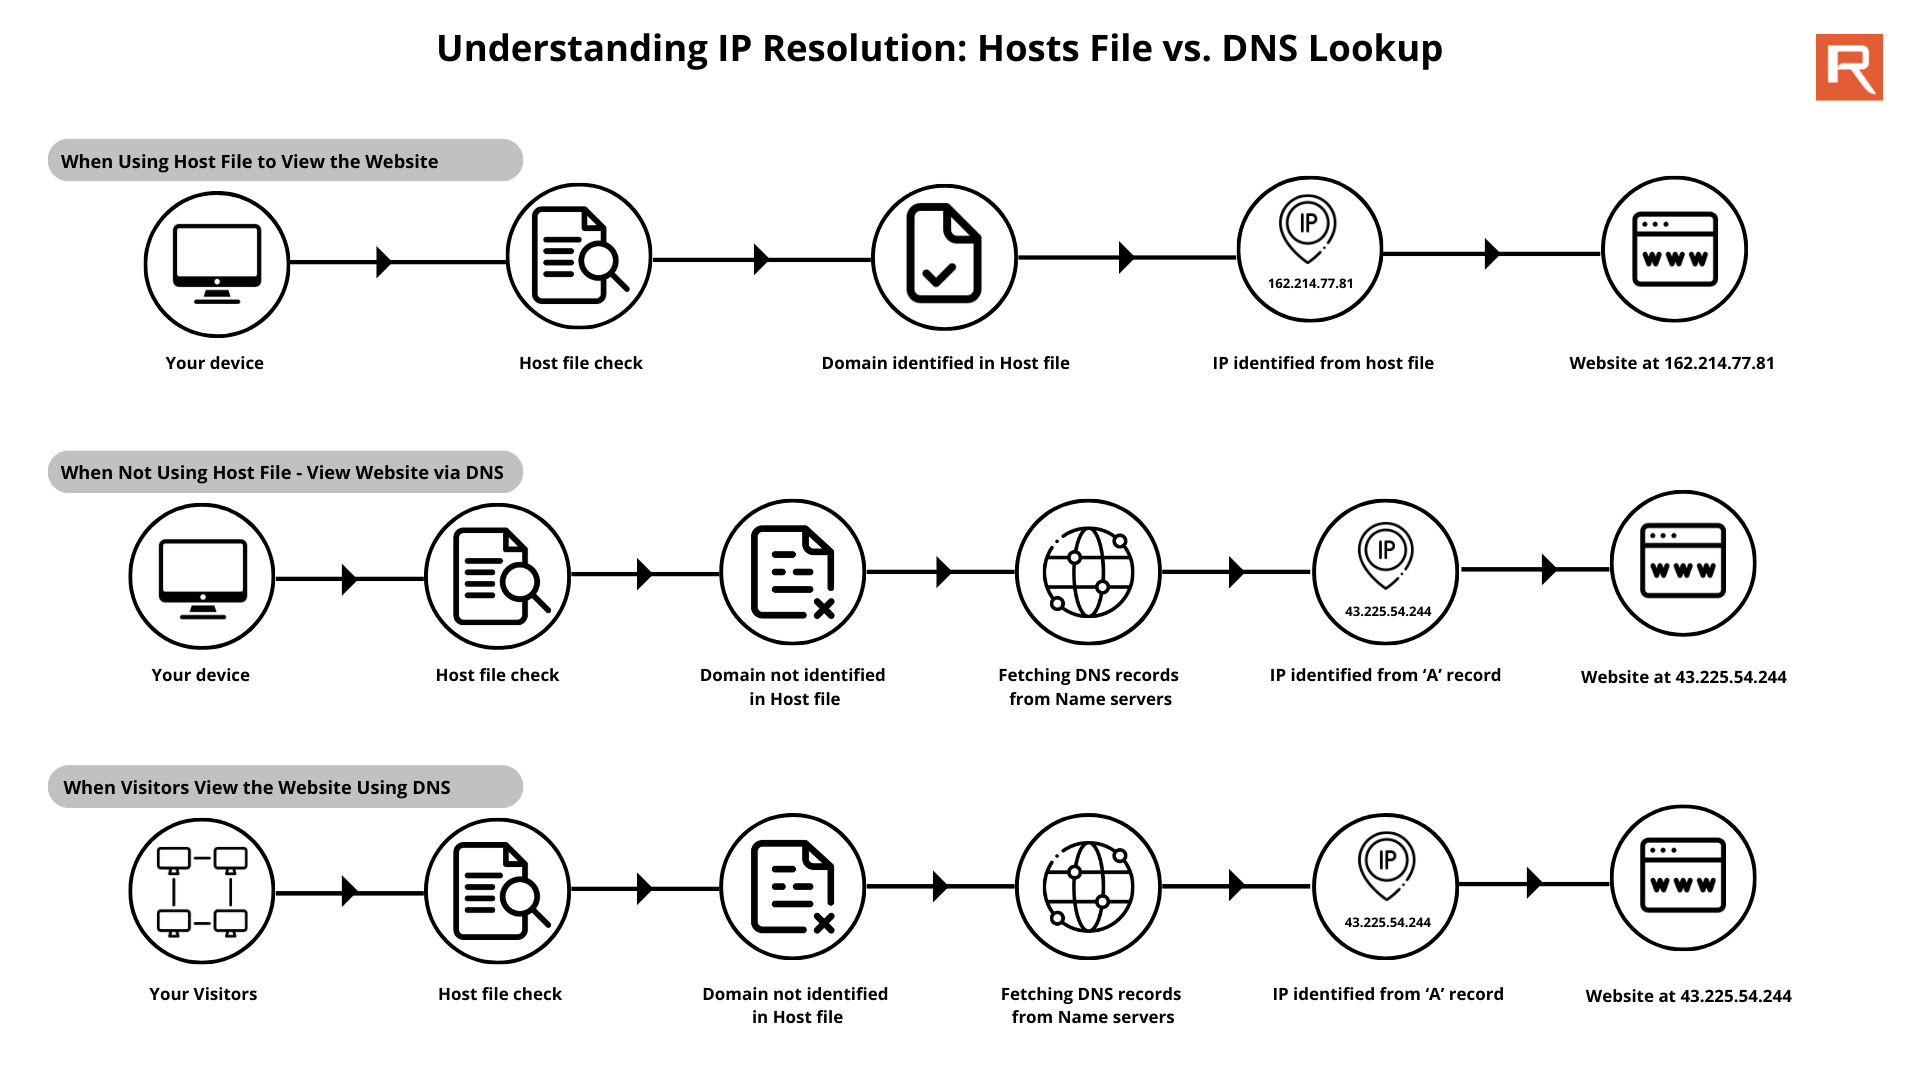
Step 1: Finding Your Server's IP Address
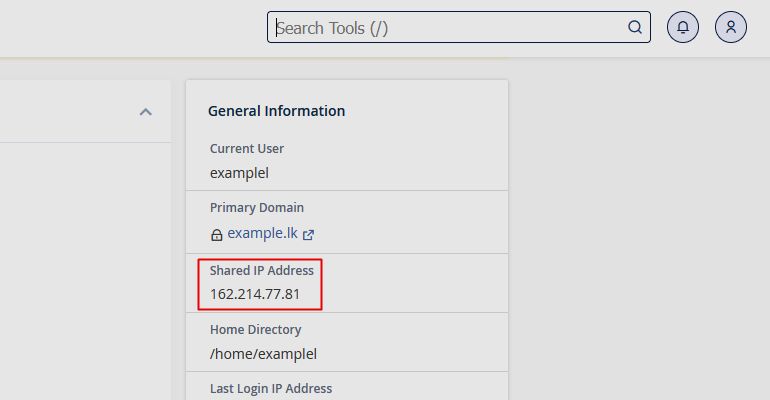
Before diving into the hosts file, you'll need your server's IP address.- Log in to cPanel on your hosting account.
- Look for the Shared IP Address in the General Information section on the right side of the dashboard.
- Make a note of this IP address-it's what you'll use in the hosts file.
Step 2: Editing the Hosts File
This step is where the magic happens. Depending on your operating system, follow the instructions below to edit your hosts file.For Windows:
- Open Notepad as Administrator:
- Click the Start menu, type "Notepad," right-click on it, and select "Run as administrator."
- Open the Hosts File:
- In Notepad, go to File > Open.
- Navigate to C:\Windows\System32\drivers\etc\.
- In the file type dropdown (which usually shows "Text Documents"), select "All Files."
- Open the 'hosts' file.
- Add the IP Address and Domain Name:
- At the end of the file, add a new line with your server's IP address followed by your domain name. For example:
162.214.77.81 example.lk - Replace 162.214.77.81 with your actual server IP address and example.lk with the domain name you intend to use.
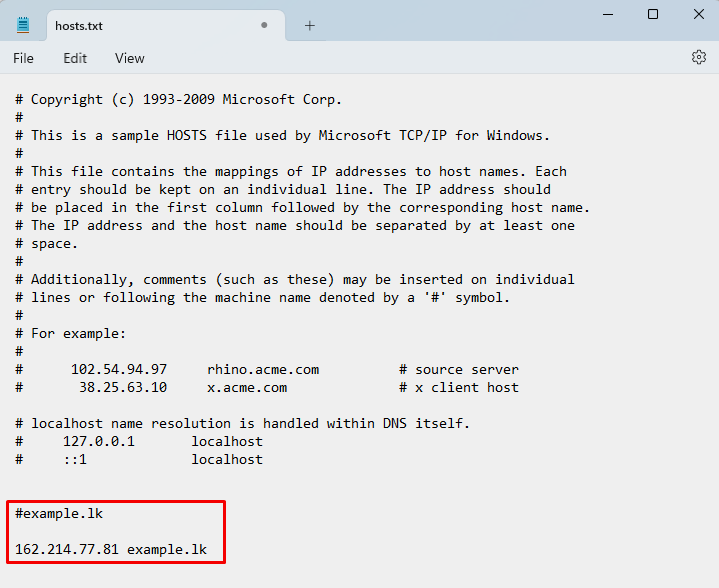
- At the end of the file, add a new line with your server's IP address followed by your domain name. For example:
- Save the File:
- Click File > Save. You may need to confirm changes due to administrator privileges.
For macOS/Linux:
- Open the Terminal:
- You can find Terminal in Applications > Utilities or search for it using Spotlight on macOS.
- Edit the Hosts File:
- Type the following command and press Enter:
sudo nano /etc/hosts - You will be prompted to enter your admin password.
- Type the following command and press Enter:
- Add the IP Address and Domain Name:
- At the end of the file, add a new line with your server's IP address followed by your domain name. For example:
162.214.77.81 example.lk - Replace 162.214.77.81 with your actual server IP address and example.lk with the domain name you intend to use.
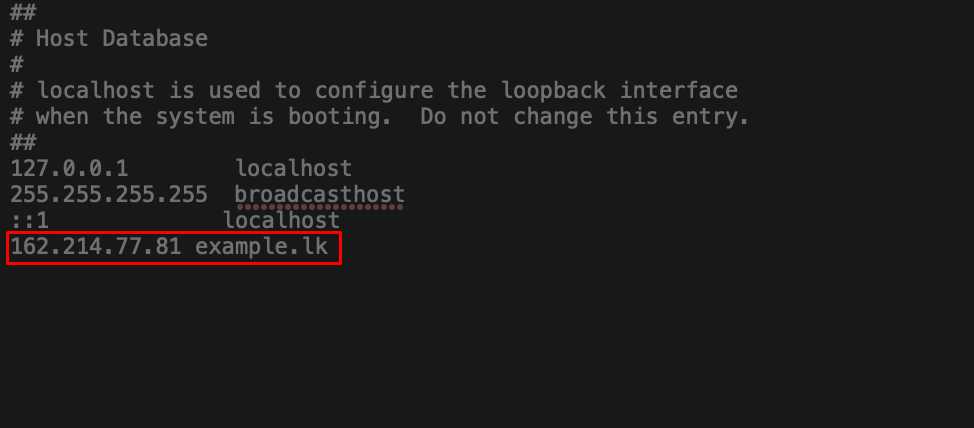
- At the end of the file, add a new line with your server's IP address followed by your domain name. For example:
- Save the File:
- Click File > Save. You may need to confirm changes due to administrator privileges.
Step 3: Accessing Your Website
Now that your hosts file is updated, it's time to see the results!- Open your web browser and enter the domain name you added to your hosts file (e.g., example.lk).
- Your browser will now load the website from your server as if the domain name is fully functional.
Important Notes
- Local Change Only: This modification only affects the computer on which you've edited the hosts file. Other users won't be able to access the site using the domain name unless they also modify their hosts file.
- Clearing Browser Cache: If you've visited the domain name before, you might need to clear your browser's cache or restart the browser to see the changes.
- Reverting Changes: To stop using the custom hosts file configuration, simply remove or comment out the line you added in the hosts file.
An Alternative Method: Using a Temporary URL
If editing the hosts file seems too technical or if you need a quicker solution, there's another method to view your website before the domain is live. You can use a temporary URL provided by your hosting service. This is a great option if you want to share the website with others without needing them to modify their hosts file. We've covered how to use a temporary URL in detail in another blog post. You can check it out here: How to Check Your .LK Domain Before Propagation Using a Temporary URL.Conclusion
Modifying your local hosts file is a powerful yet simple technique that allows you to preview and fine-tune your website before it goes live. Whether you're setting up a new site, migrating to a new server, or just ensuring everything is perfect before domain propagation, this method puts you in control of the process. By following these steps, you can streamline your web development and avoid any delays associated with DNS changes. When you're ready to launch, trust register.lk to handle your hosting and domain needs with reliability and performance. With our top-tier support and robust services, you can confidently take your website live, knowing that you're backed by Sri Lanka's leading provider. Don't let technical hurdles slow you down-start your web journey with register.lk today.Preview your website before it's live with these simple steps. For seamless hosting and domain management, choose register.lk.
 Written by: Register.lk Support Hero - Kulitha


